My wife said that I’m “fearless” when I do RV repairs. On the other hand, I’d describe my attitude as something between the OZ’s Cowardly Lion and a bull in a China shop.
Anyway . . .
On our last (actually our first) Sea View RV outing, I noticed water leaking into one of our motorhome’s basement compartments. At first I brushed it off, hoping it would just solve itself and go away, but the water just kept a coming.
So when we returned home after our outing, I decided to try tracking down the cause of the water leak.
Here’s the story . . .
DISCOVERY
I first noticed water on the lid of the SEWER hose bin Water was dripping from this opening above the SEWER bin
THE FIRST CUT IS THE DEEPEST
The leaking water lines ran underneath our shower tub and were pretty much inaccessible.
At first I thought the leak was coming from one or both of the basement 90-degree water line connections. But I wasn’t sure, and even if these connections were the cause, I couldn’t access them.
So . . .
First, a small hole saw opening, then a 2″ x 6″ cut in the Sea View’s driver side wallNow I was able to confirm that the leak was not coming from either of the water line’s 90-degree fittings
THE SECOND CUT WAS A LOT EASIER
Now I knew that the leak originated under the shower tub . . . somewhere.
I decided to make another inspection hole so that I could see under the tub near the shower faucet . . .
The cut in the wall is near the water lines from the shower. (The cut in the floor was to check for possible obstructions.)When I looked through this second hole, I found the water leak.
FOUND THE LEAK!
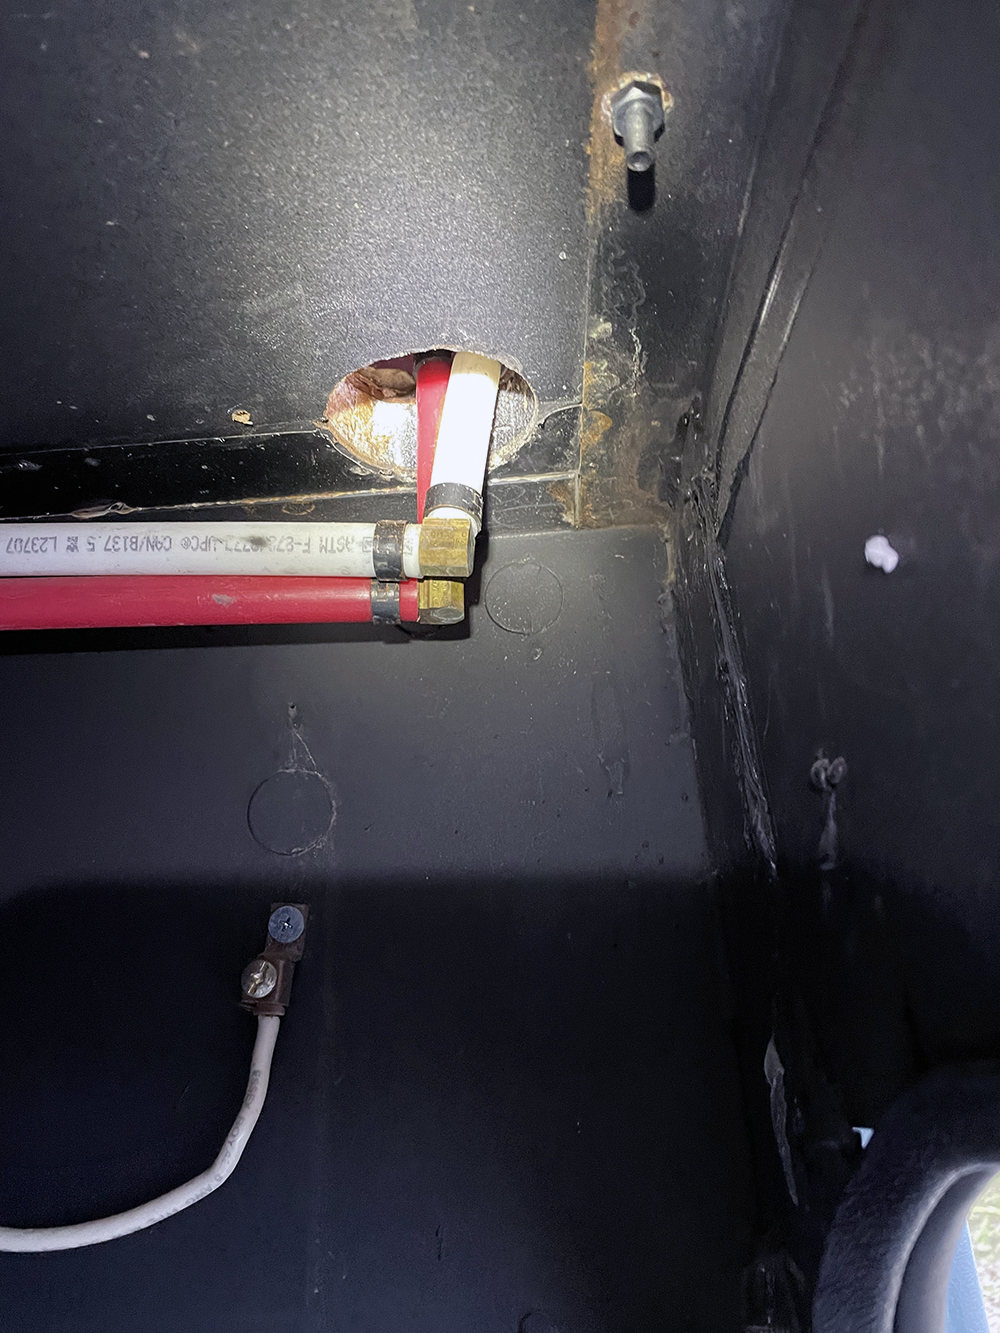
To pin down the exact thing that was leaking, I figured the leak had to originate in the shower controls.
First, I unscrewed the shower controls so that I could see behind itThen I turned on the water pump. After a few minutes the hot water line (Red) started getting wet – the Leak!The Culprit – the 90-degree fitting on the top of the hot water line.Anatomy of Our RV Water Leak (click on drawing to enlarge)
THE FIX
Originally, I did not want to attempt to fix the leak. We are leaving on another RV trip this Wednesday, and I didn’t want to do anything that would put our Sea View out of action.
But what the hell . . .
So, I needed to remove the leaking fitting and replace it with another. Easier said than done.
First, remove the shower head controls. No problem.
Next, remove the leaking fitting (a 1/2″ PEX elbow). Dicey. I used my Dremel tool with a rotary cutting head.
Finally, enlarge the shower head control opening so that attaching a new fitting wouldn’t be a problem.
Enlarged the shower control opening by 1/2″ in order to get a new 90-degree elbow on the hot water line (Red)Shower controls lowered by about 1/2″. Hunky dory.
CLEAN UP
Patching those holes . . .
Before & After – Hole in RV SideBefore & After – Inside Hole turned into a VentCalico Cat on our Roof
We’re talking about two Fan-Tastic Fans which we recently installed on our RV roof. Explanatory pictures follow . . .
The First Fan Install
The Old Fan Over the Bathroom. It had two speeds – on & off and had to be hand cranked.First step in removal – scrape the caulk off.Unscrew the bolts holding the fan to the roofPry out the old fanBathroom view with fan removedNew fan inLiberal doses of Dicor around all the edgesWe added a cover over the fan so we could use it when it’s raining
Second Fan Install
We ordered the same model fan for the 2nd install, but Camping World sent the wrong fan, but we used it anyway. We’re going camping soon and there’s no time to return it and get another fan.
Anyway, 2nd install looks remarkably like the first fan . . .
Off with the caulk & pry outSecond fan had LOTS of wires, but we only needed two . . .Power!All done