
DISH Pro Hybrid Winegard Travler Upgrade (No Longer Recommended)
Updated on 6/15/2017
__________________________________________________________________________
NOTE: I no longer recommend this Winegard Travler upgrade. However, I DO recommend the DPH42 Switch Option if you want to use a Hopper 3 with a Winegard Travler.
__________________________________________________________________________
In December 2015 DISH introduced “DISH Pro Hybrid” equipment:
- Hybrid Solo Hub
- Hybrid Duo Hub
- Hybrid Tap
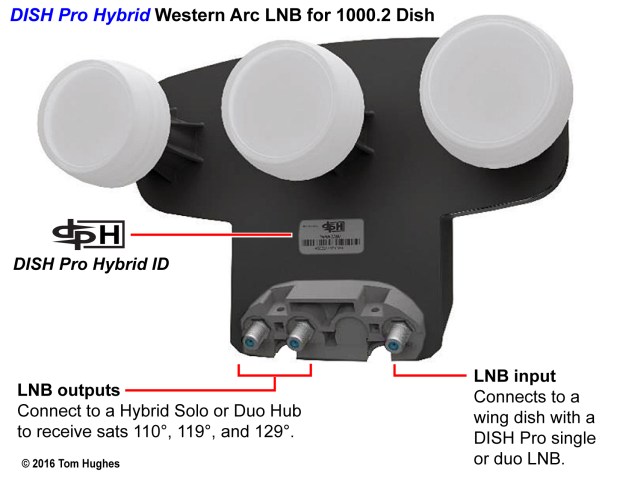
- Western Arc DISH Pro Hybrid Triple LNB for the 1000.2 dish
- Eastern Arc DISH Pro Hybrid Twin LNB for the 1000.2 dish
All this “hybrid” equipment (DPH) allows the Hopper/Joey/Super Joey to network with less wiring and less equipment.
Note that DPH equipment only works with the Hopper/Joey/Super Joey, not VIP receivers (211, 622, 722, and so on).
So if you’re an RVer with a Hopper system, the new DPH equipment is worth a look see.
WINEGARD TRAVLER SK-1000 DPH UPGRADE INSTRUCTIONS
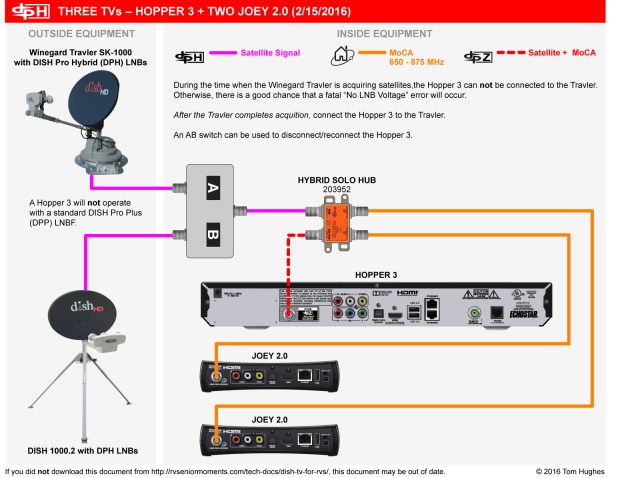
NOTE 1: (2/15/2016) This upgrade has been tested with a Hopper with Sling (“Hopper 2”) and a Hopper 3. A Hopper 3 will work with a DPH upgraded Winegard Travler. However, the Hopper 3 must be disconnected from the Winegard Travler during satellite acquisition.
NOTE 2: Performing this upgrade would probably void any warranty on your SK-1000. Do this upgrade at your own risk — what worked for me may not work for you.
NOTE 3: If you use a 1000.2 tripod dish, you should also upgrade this to DPH. Only the 1000.2 dish, not a 1000.4, can be upgraded to DPH.
- Raise the Winegard Travler SK-1000 using the SK-1000 Controller Box.
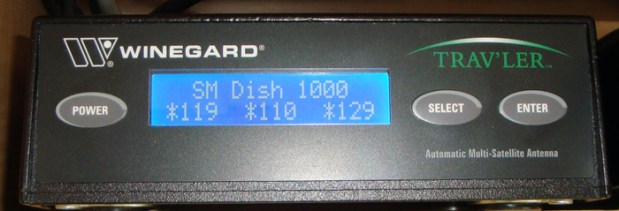
SK-1000 Controller Box
- After the SK-1000 has finished acquiring satellites, remove power from the SK-1000 Controller Box.
- Disconnect coax cables from the “A”, “B”, and “C” ports located on the base of the Winegard Travler SK-1000. Do NOT disconnect the Controller Box cable.

SK-1000 Base
- Remove all four bolts on the LNB Guard using a 3/8-inch socket wrench.
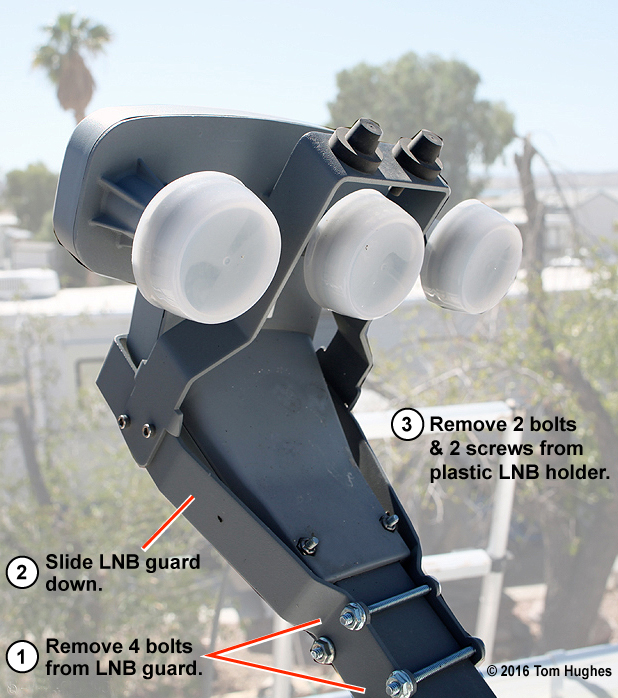
SK-1000 LNB
- Slide the LNB Guard down the LNB arm.
LNB Guard
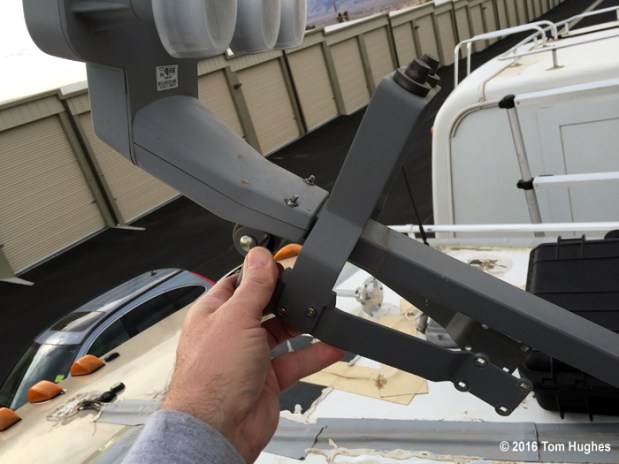
- Remove the plastic LNB Holder.
- On the DISH Pro Plus (DPP) LNB, number each LNB output (1, 2, and 3) and number each coax cable.

Number the Wires before disconnecting any of them
- Then remove each coax cable and put the DPP LNB aside.
- Use a continuity meter on each number coax cable to determine which cable corresponds to which lettered output (A, B, C) on the base of the SK-1000. I used a Super Buddy meter to test A, B, and C. Regardless, you need to find out which of the lettered ports is inactive. Also, you need to identify the Port 1 DPH connection because this port must be connected to the Hybrid Solo Hub.
- Connect numbered coax cables 1 and 2 from the SK-1000 to the two LNB outputs on the DPH LNB. Do NOT connect numbered cable 3 to the DPH LNB.As an aside, you could connect cable 3 to the DPH’s LNB IN port. That way you could connect a single LNB “wing” dish to your Travler — like one for sat 72.7. However, remember that one of the lettered ports (A, B, or C) would become an input, not an output.
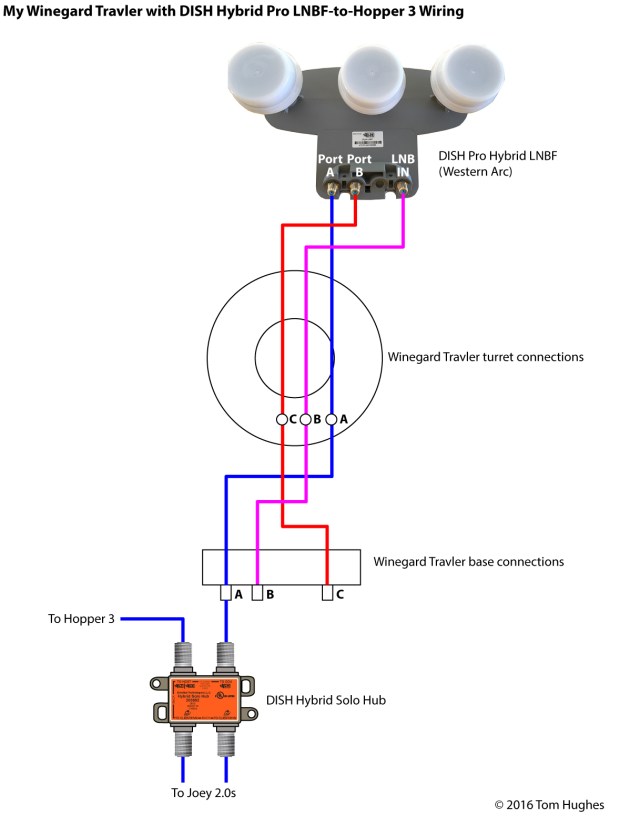 Modified Winegard Travler Wiring
1/24/2016 WING DISH UPDATE:When I tried adding a wing dish to my DPH modified Travler, it did not work properly.Though my Hopper with Sling did “see” the extra wing dish satellite (77°) . . .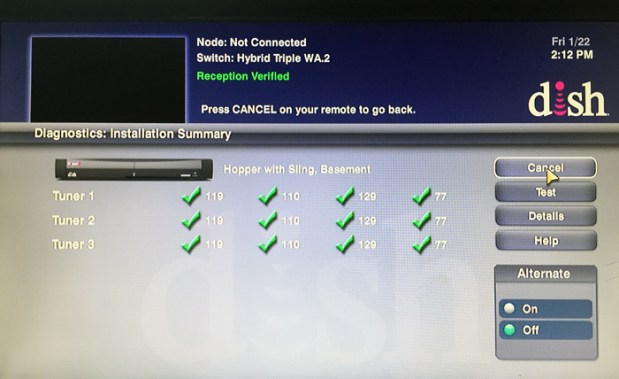
. . . satellite 110° signal strength was almost 0, and satellite 129° signal strength was very low: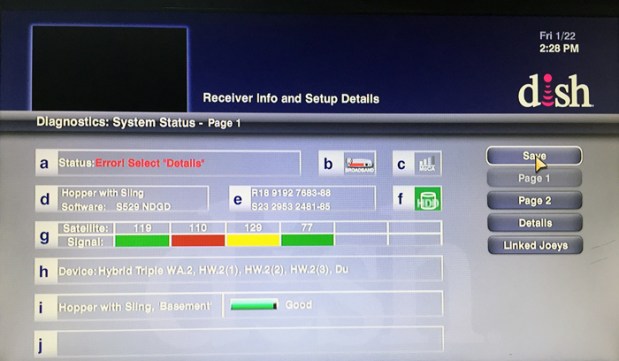
I verified these readings at the Winegard Travler base with my Supper Buddy meter.However, after I disconnected the wing dish coax from the Travler’s DPH LNBF, the signal strength for sats 110°, 119°, and 129° returned to normal.
- Tape the metal end of numbered coax cable 3.
- Reattach the plastic LNB Holder to the DPH LNB.
- Reattach the LNB Guard.
- Connect a Hybrid Solo Hub to Port 1 of the SK-1000 DPH LNBF.
NOTE: Only one Hopper 3 is allowed per dish.
REMEMBER: From step #9, one of the ports (A, B, or C) will NOT be connected to the DPH LNB. An unconnected port cannot be used.
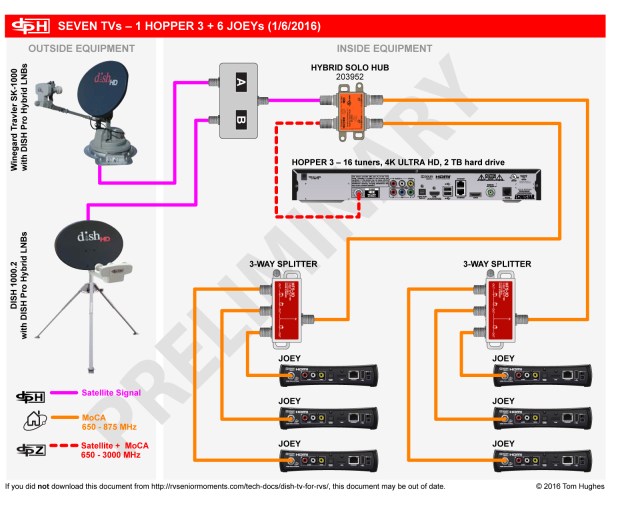
Hopper 3 Network – 7 TVs is the Limit
- Apply power to the SK-1000 Controller Box.
- Stow the SK-1000.
- Disconnect the Hopper 3 from the Winegard Travler.
- Raise the SK-1000 and let it finish acquiring satellites.
- Then reconnect the Hopper 3 to the Winegard Travler.
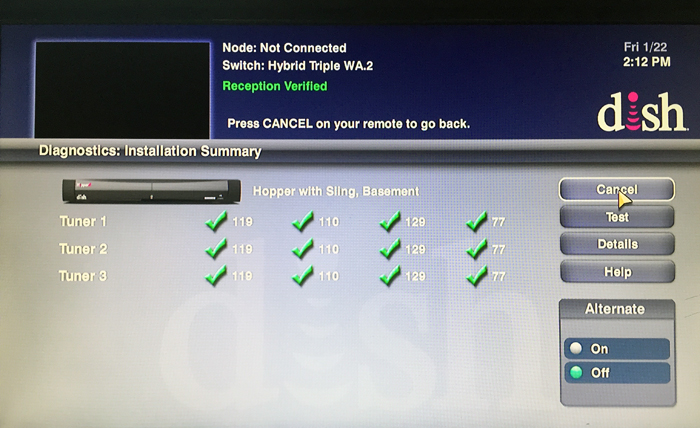
- Go to the Diagnostics screen. Then select Receiver > Status > Dish > Test Installation:

The new “Check Switch” screen

TEST METHOD
One Hopper 3 was tested:
Two Hoppers with Sling were tested:
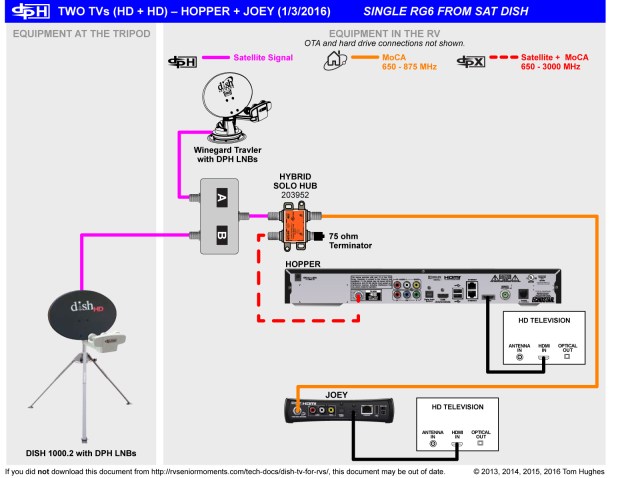
Hopper/Joey DPH Setup
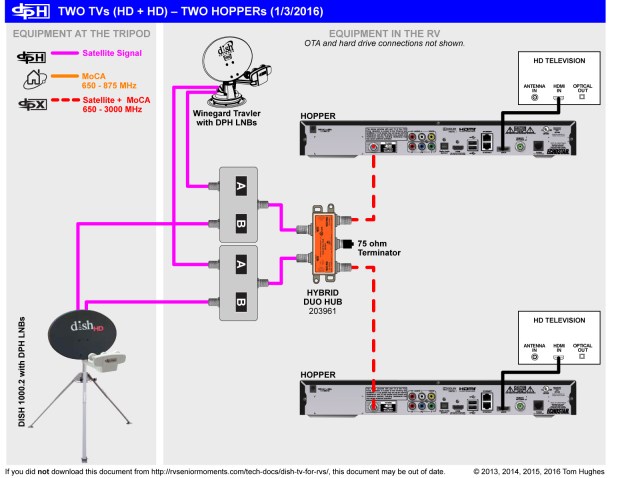
Two Hopper DPH Setup
After completing my DPP to DPH swap, I used a Super Buddy meter to test each satellite ID (and signal strength) from my upgraded Travler.
I think the DPH upgrade passed the test.
Super Buddy Setup
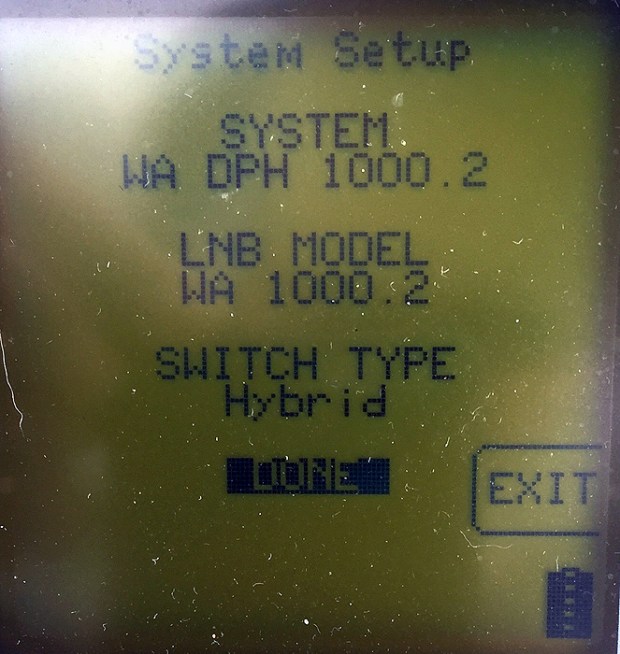
Super Buddy Setup Screen
Super Buddy Travler Sat IDs & Signal Strengths
NOTE: Sat 61 was also acquired in Manual Mode. However, its LOCK and Signal Strength is not shown. Take my word — it worked as well.
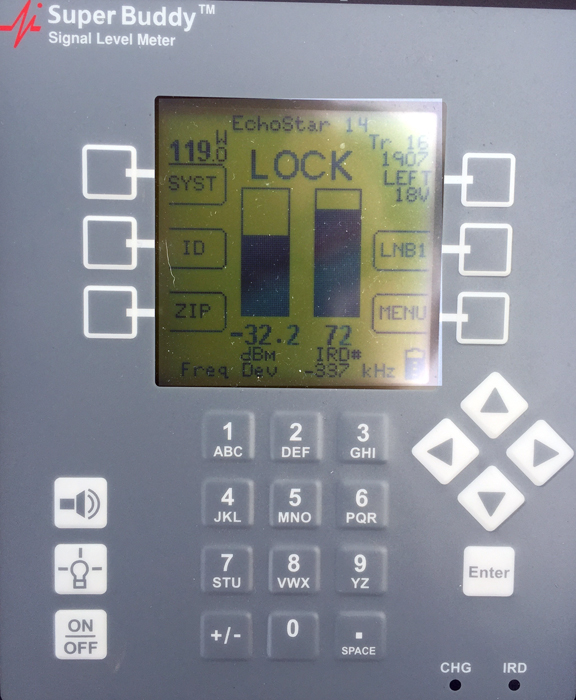
Satellite 119 LOCK & Signal
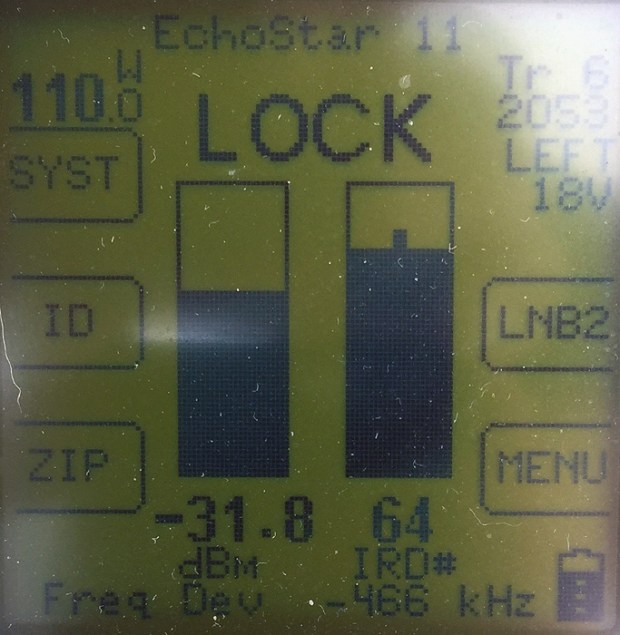
Satellite 110 LOCK & Signal
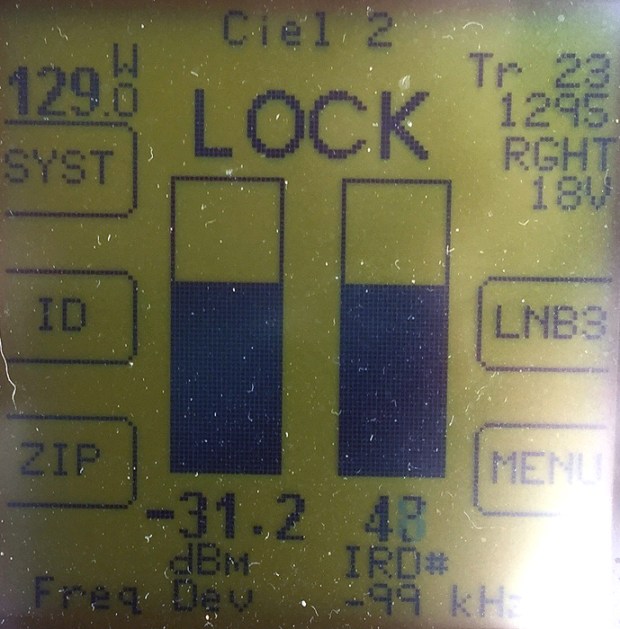
Satellite 129 LOCK & Signal

