Or, “How I rewired my transfer switch without killing myself.”
The Trouble with Features
After installing our Victron MultiPlus II Inverter/Charger, we were very happy with its performance and features. Simply, it slices, it dices.
However, one of the MultiPlus’s features had a downside – we lost half of our generator’s power. So while riding down the road in the summer heat, we now have one air conditioner instead of two. What’s the deal?
Dog Bones
Most RVers probably own a 30A-to-50A “dog bone” that allows connecting a 50A RV to a 30A power supply.
The Dog bone Adapter
Since 30A power only has a single “hot” line, a dog bone simply connects the single 30A hot line to both 50A power lines (L1 and L2).
With a dog bone everything’s hunky dory, but your RV can only use up to 30A, not 50A.
Enter the Victron MultiPlus.
More Technically Speaking
In order to distribute power to the RV, the Victron handles 50A power (“split phase”) and 30A power (“single phase”) differently.
When the MultiPlus detects 50A split phase AC power, it just passes incoming power on L1 and L2 through to the AC Out (top drawing below).
On the other hand, when the Multiplus senses 30A single phase power, it disconnects the incoming L2 AC power, but connects L1 and L2 AC power internally (see circled areas below). The MultiPlus does this so it can distribute power to the AC Out.
However, if your generator outputs single phase power (like ours), then you’ve just lost half your generator’s power.
How the Victron MultiPlus II handles incoming AC Power
Notice the voltage measurements for split phase and single phase systems:
Split Phase: L1 to Neutral = 120 VAC L2 to Neutral = 120 VAC L1 to L2 = 240 VAC
Single Phase: L1 to Neutral = 120 VAC L2 to Neutral = 120 VAC L1 to L2 = 0 VAC
Single Phase RV Generators
Before explaining our generator “fix”, here’s how a single phase generator outputs power:
The takeaway from the above graphic is that the Black (L1) and Red (L2) AC outputs both have the same voltage and the same phase (single phase). In addition, the voltage between L1 and L2 = 0.
Fooling the MultiPlus
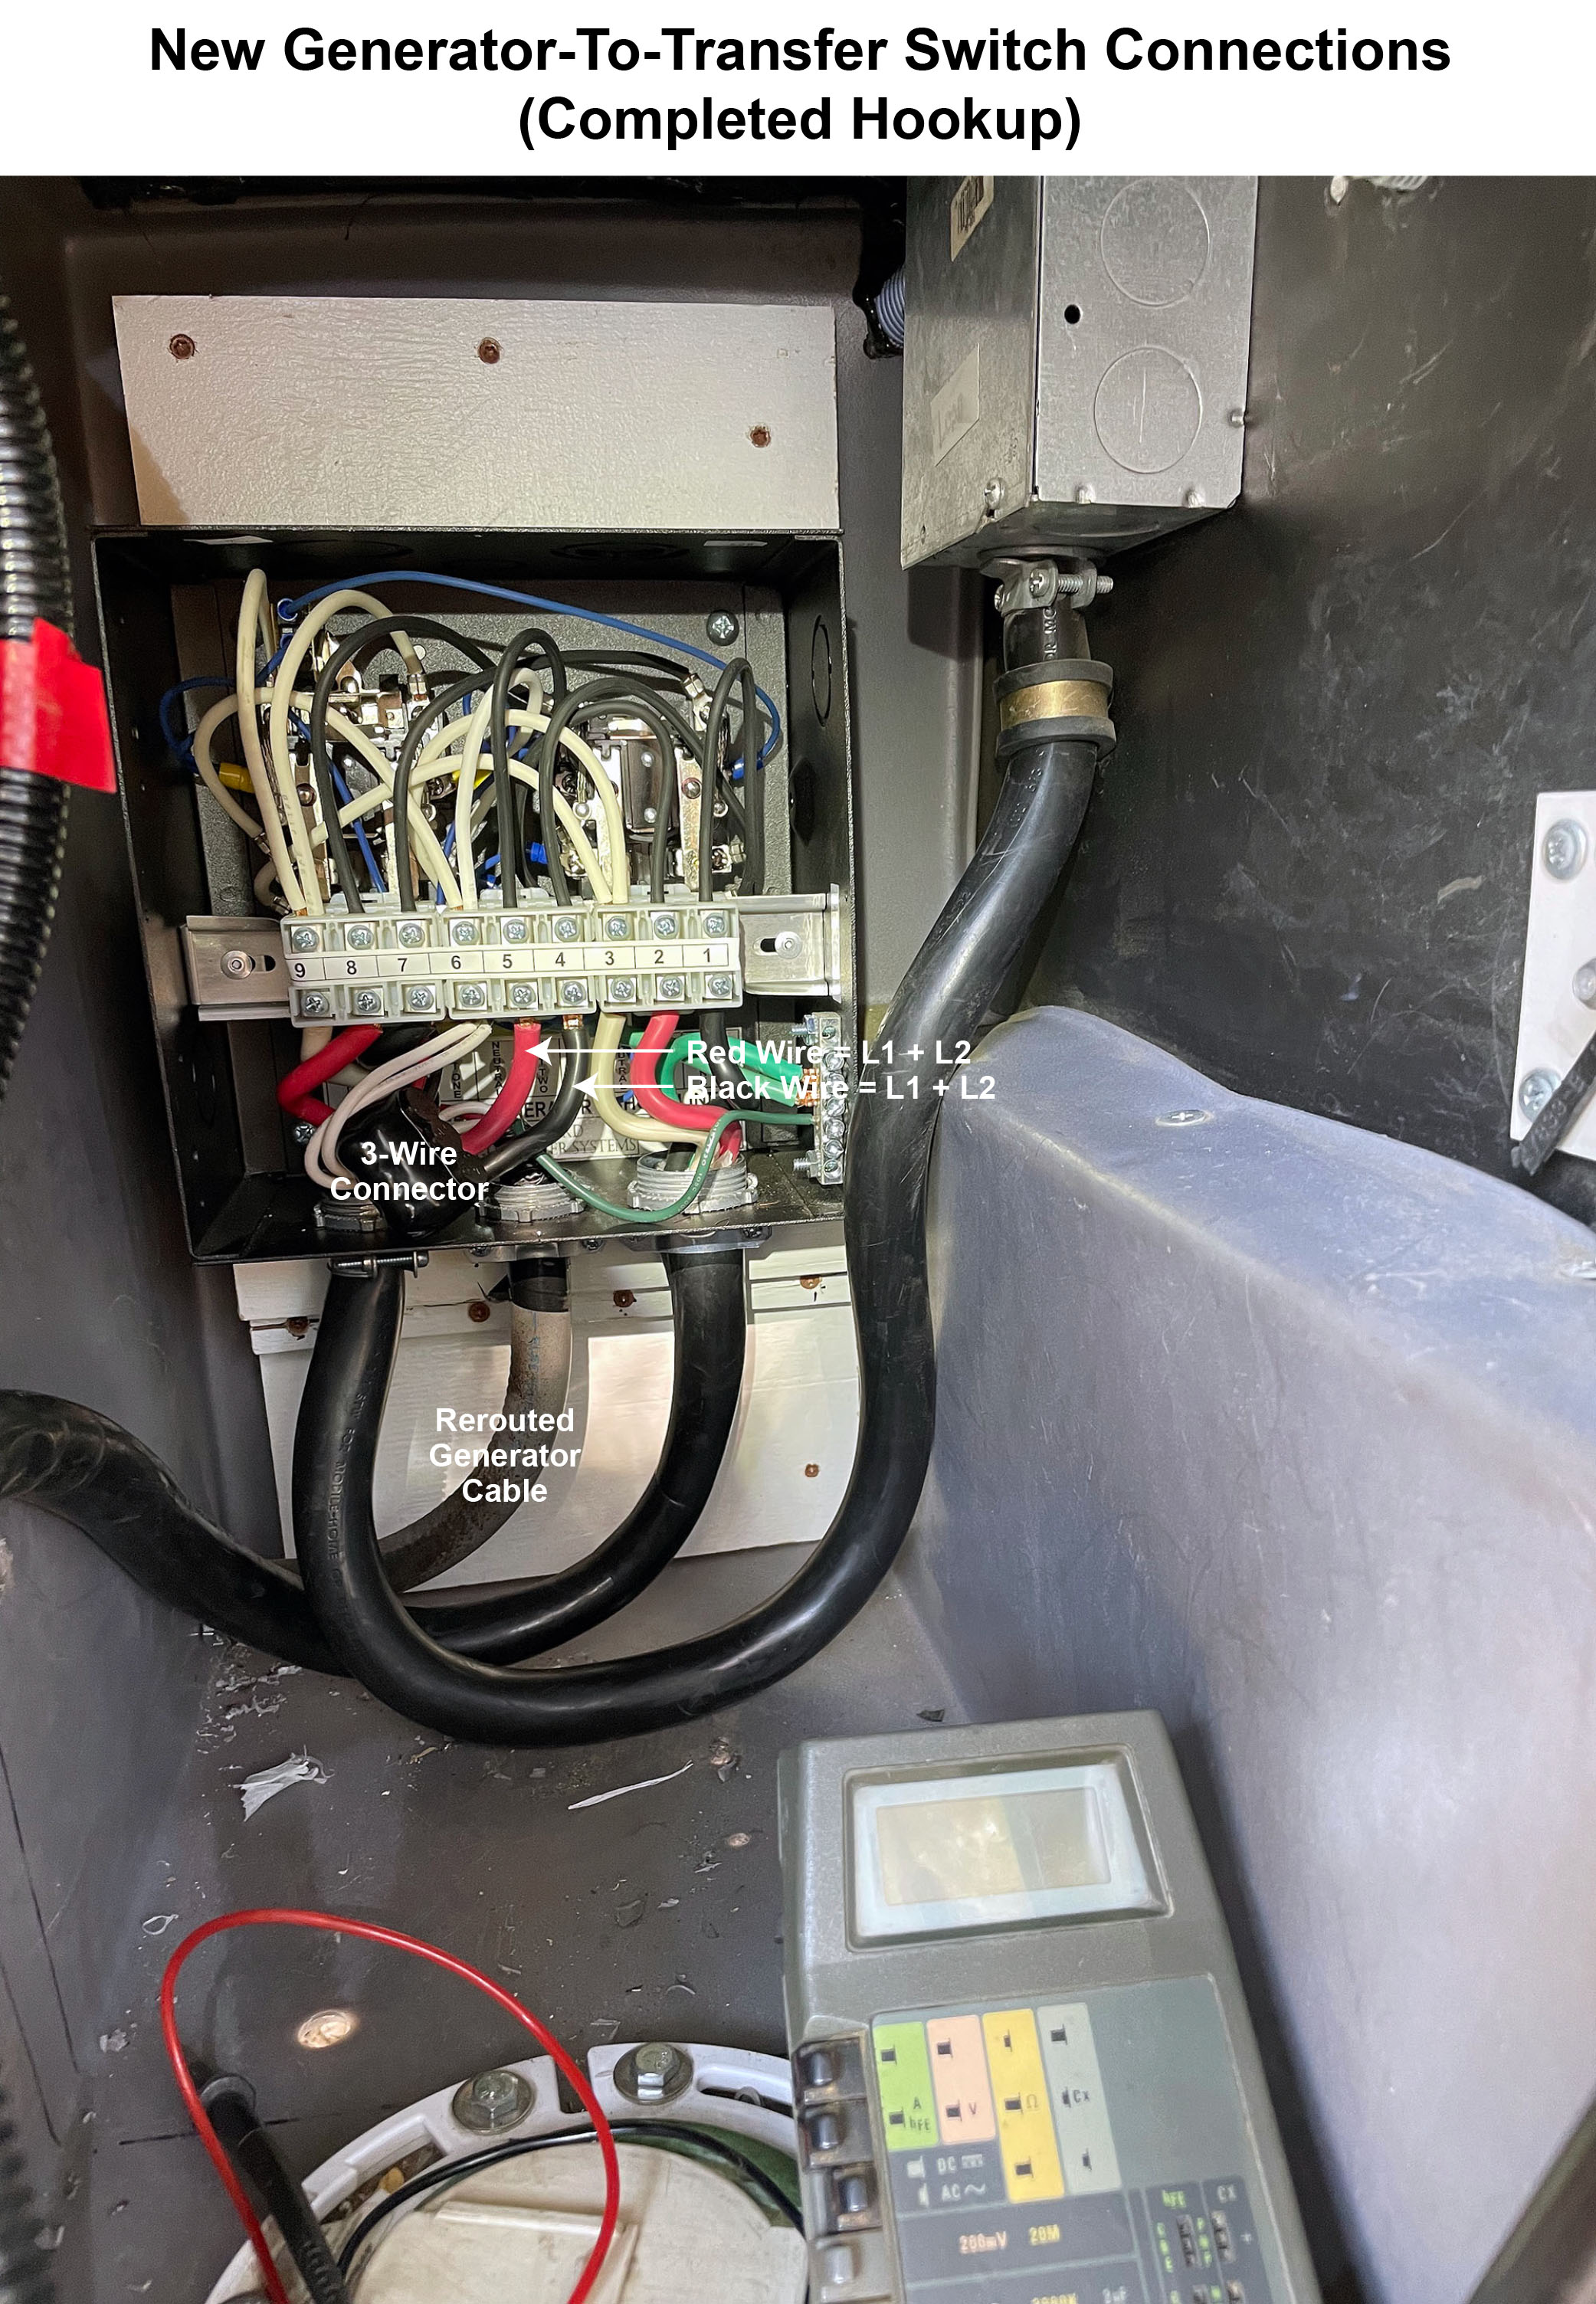
To make use of all our RV generator’s power, we rewired our generator-to-transfer switch connection to create a “dog bone”.
To do this, we connected the generator’s L1 and L2 together and also connected the generator’s two neutral wires.
Test Wiring
Final Wiring
It worked! We can now fire up both our air conditioners without fear of tripping breakers.
Credits
This upgrade would not have been possible if not for the help from several excellent online sources. The single best source was from the Changing Lanes YouTube channel, in particular this video:
We camped at Harris Beach in Brookings, OR from August 4th to the 18th.
It’s a short walk to the Pacific Ocean . . .
We’ve been here before . . . Flirt remembers
Flirt in 2019 and in 2022
We stayed at At Rivers Edge Resort in 2019
The weather was a glorious change from the triple-digit furnace we’ve been used to. The temperatures next to the Pacific Ocean ranged from the 60’s to 70’s. Lots a humidity, but no heat.
Sat Photo of Harris Beach
Official Oregon Campground Map
Campground Tour
Our Site A11
Our campsite even had a yard
Our favorite site – great ocean view
There are several yurts available at Harris Beach
Plenty of restroom/showers
Plenty of full hookup sites – but advance reservations are really necessary
S’mores
First time that we had s’mores in years
Sunset Trail
There are several walking trails in the campground. We tried all of them.
Fresh blackberries along the Sunset Trail
Flirt after our walks
Redwood Trail
We had to drive a few miles to get to this trail
Moss everywhere
Butte Trail
Just a short distance from the entrance to Harris Beach State Park. The trail had several switchbacks that took you higher and higher as you walked.
Trail End View
Click on the photo to enlarge it
Blue Water Cafe
Discovered this breakfast gem when new were doing laundry.
They have smaller size meals, too
Tolowa Dunes State Park
Just down the road from Brookings, a favorite of dog owners . . .
Jedediah Smith Redwoods State ParkDriving Tour
Jan wanted to see redwoods . . . and we did . . . up close . . .
We posted photos of the damage (like the picture above) and asked what would be the estimated cost of repair?
Here are the summarized results . . .
HOW MUCH TO FIX?
From RV Forum (www.rvforum.net):
Isaac-1 – My guess is you can get that fixed for under $7,000 if you take it to Mexico.
Skookum – I agree with the others who have posted so far…that’s several thousands of dollars worth of damage. If you put 20 hours on it at $100/hr, minimum 2k and I bet it’s more.
From IRV2 (www.irv2.com):
amosnandy – As an insurance adjuster, just from the pictures I would estimate between $20,000 & $25,000. The cap needs to come off, repair both sides and there is likely damage to the inner structure.
Ray.IN (25,969 posts) – amosnandy is right, unless the rear cap is irreparable. If that is the case, the only option is to locate a good used rear cap somewhere. If one cannot be found you’re looking at the MH being totaled.
From RV.net (www.rv.net) . . .
way2roll – To get a proper estimate I think you’ll have to take it to a shop. And although there is no visible interior damage, water intrusion can mess things up a bit.
JoeH – I would guess $5k, +/- $1.5k.
valhalla360 – If it’s just cosmetic, you might be lucky and get it done for $5-7k.
Grit dog – Personally I’d say $5k is on the high side.
HOW DID THE ACCIDENT HAPPEN?
Forum users seemed much more interested in HOW the accident happened than answering my question on cost to repair. Many of them predicted what might have occurred.
From RV Forum (www.rvforum.net):
Old-Crow (3,405 posts) – The only way I can see this damage occurring is if the tow bar came disconnected and slid under the coach when he stopped.
Mark_K5LXP (2,708 posts) – If the tow bars were not aligned so the RV end is higher than the toad end, during a hard stop the inertia will push the front of the toad up and it can hit the back of the RV. Note how high up the damage is. So it’d be my observation the tow bars weren’t aligned properly.
Gary RV_Wizard (76,539 posts) – The toad was somewhat higher than the hitch pivot point, so the toad “climbed” in the hard stop, pivoting the tow bar upward and literally lifting the front of the toad off the pavement. Best practice for a tow bar is to have it dead-level or at slightly upward angle to the coach receiver. I prefer the up-angle, thus forcing the toad to dive under rather than climb. That helps keep the toad wheels in contact with the road. The other thing this implies is inadequate toad braking in a hard stop. Many owners intentionally adjust the braking to be light and delayed relative to the coach, fearing brake drag on long downhill grades. That usually yields little or no braking in a panic stop.
From IRV2 (www.irv2.com):
WHSouthwind – Did the jeep pivot up without disconnecting. Looks like that’s what happened. High impact point.
From RV.net (www.rv.net) . . .
zigzagrv – I cannot understand how the Jeep did that unless the Jeep flipped up???
Grit dog – Out of curiosity though I can’t figure out how it didn’t hit lower on the Moho, like in the bumper area.
HOW DID THE ACCIDENT ACTUALLY HAPPEN?
After a sudden stop, our Jeep actually pivoted up on our tow bar and crashed into our RV’s rear cap.
How?
First, our Demco toad braking system was disabled. Our Jeep’s battery was dead so no brakes. At the time we were on our way to an auto parts store in Lompoc, CA to pick up a new battery. No irony here.
Second, Lompoc, CA. This small city has water swales on many of its streets. These swales are shallow culverts right across the road and unmarked by any signage. We encountered a pair of these swales while driving at speed (25 mph) though a Lompoc suburb. Our speed was too fast. When we hit the swales, our RV seemed to take a nosedive and we panic braked . . . the rest is history.
Third, our tow bars were installed and aligned properly and not the cause of the accident as some suggested.
Our two bars weren’t the problem
THE BEST ADVICE WE RECEIVED
In three posts on RV.net, we think RickJay offered the best comments and advice . . .
Sorry to hear of your accident. I know it’s a 21 year old rig, but still relatively new to you, so boo-boos like this seem to have an extra-sting to them when they happen. Still, keeping a focus on the overall age of the rig might be helpful.
Due to the age of the rig, it’s possible this won’t be covered under his insurance. For example, on our rig (almost as old as the OP’s) we have “limited collision” which only pays when another driver causes the damage, so it wouldn’t cover an incident such as this. So this quite possibly might be an out-of-pocket expense for them.
Heck, depending upon how much longer I intended to have the rig, I could probably even convince myself to make it water-tight (a good, white tape, perhaps even Eternabond?) and just live with it.
Did you say Eternabond?
HOW WE’RE GOING TO FIX OUR RV – the “Safari” Solution
First, we will not try using our collision insurance. At best, even if it covered the repair, our rates would most likely go up. No thanks.
Second, we will not attempt fixing the fiberglass ourselves. We don’t have the tools nor the skill. We’re not going to fall victim to the Dunning-Kruger effect.
Third, it will be a DIY fix. Our local RV shop doesn’t do body work and the nearest shop is too far away – and most likely too expensive for us. We think it would be foolish investing possibly thousands into a 21-year-old RV.
We’re going with the under $500 “Safari” fix . . .
Plywood (painted of course) & Flip-Toggle Bolts . . .
We don’t usually write about KOAs that we stay at because, well, they’re the McDonalds of campgrounds – mediocre, average, and unsurprising. You always know what you’re getting.
However, the Cloverdale KOA is different . . . and then some.
First, it’s a long and winding 4-mile road into this KOA. It’s narrow, tree-ey, and one-lane in a spot.