Hopper 3 & the Winegard Travler
2/4/2016 (updated 6/15/2017)
__________________________________________________________________________
NOTE: I no longer recommend this Winegard Travler upgrade. However, I DO recommend the DPH42 Switch Option if you want to use a Hopper 3 with a Winegard Travler.
__________________________________________________________________________
Yahoo!
After an afternoon of testing, I was able to get a Hopper 3 and a Joey 2.0 to work with the rooftop Winegard Travler SK-1000 dish on my RV. Up until an satellite TV program appeared on my Hopper 3, I gave the Hopper 3-Winegard Travler combo a 50/50 chance of success.
Actually, it took about as much time as a Hopper with Sling (or “Hopper 2”).
However, there are a couple of provisos:
- Upgrade the Western Arc Dish Pro Plus (DPP) LNBF on the Winegard Travler SK-1000 to a Western Arc Dish Pro Hybrid (DPH) LNBF. See DISH Pro Hybrid Winegard Travler Upgrade.
- Avoid the Travler’s “Blue Screen of Death”.
See “How to Avoid the Blue Screen of Death” at the end of this article. - Hopper 3 can acquire sat 61.5!
See “How to Acquire Satellite 61.5” at the end of this article. - Connect Port 1 of the DPH LNBF to a Hybrid Solo Hub.
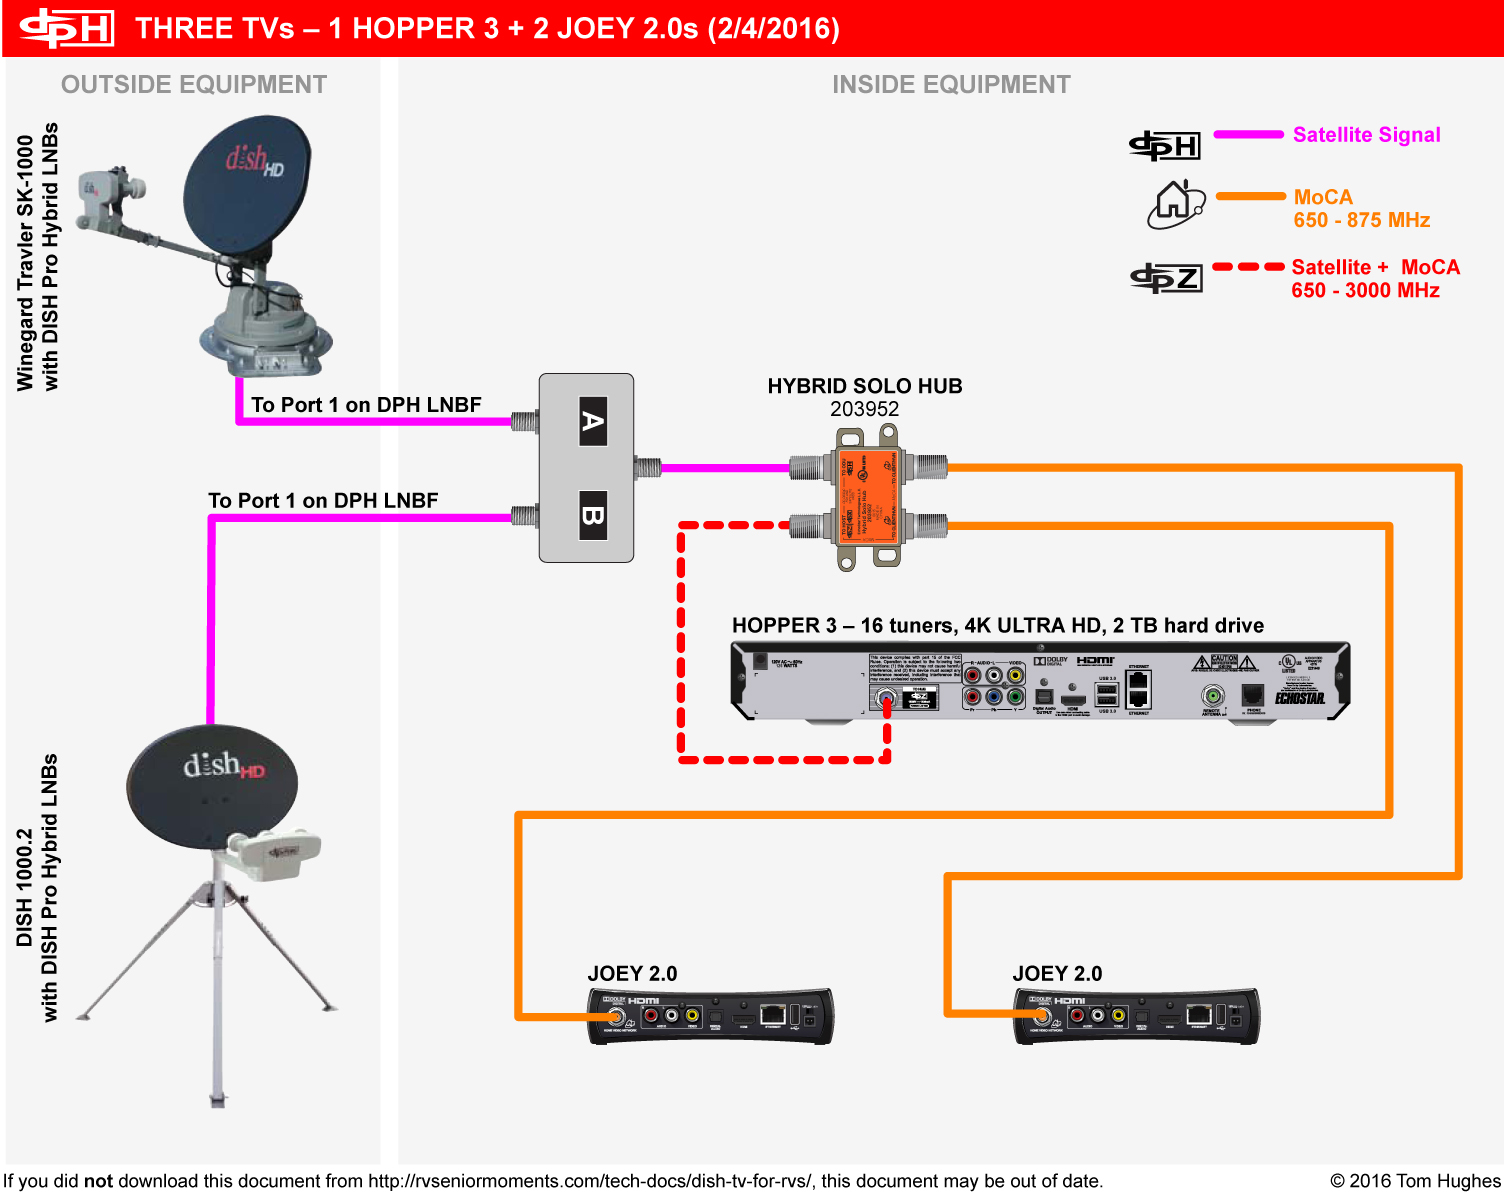
See “How Do You Find Port 1 on a Winegard Travler” at the end of this article.NOTE: If you are just using a Hopper 3 (and no Joeys), then the Hybrid Solo Hub is not needed. You can connect Port 1 directly to a Hopper 3.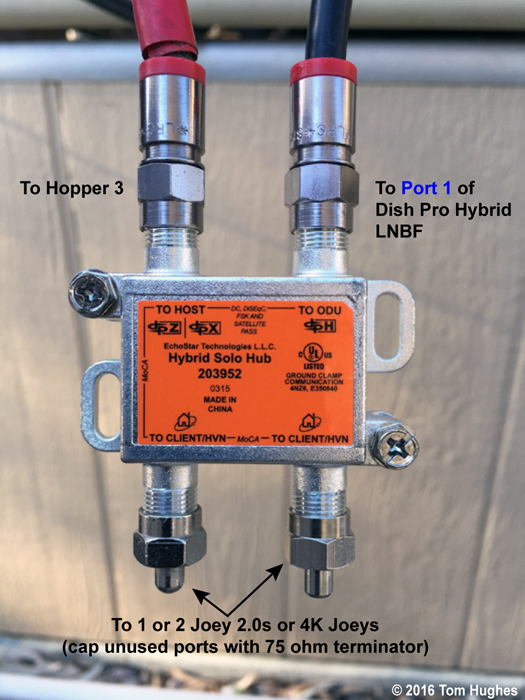
Hybrid Solo Hub Connections

- If you’re activating your Hopper 3 first the first time, then see Hopper 3 Activation & Diagnostics.
- Where can you buy all this “hybrid” stuff? Go to Dish Depot.
Otherwise, if your Hopper 3 has already been activated and you’re just moving it into your RV, then follow these steps:
- Connect your Hopper 3 to your DPH modified Winegard Travler (or a DPH-modified 1000.2 dish) as shown:

Hopper 3 & Winegard Travler
- Disconnect your Hopper 3 from the Winegard Travler. Then raise the Winegard Travler. This display should appear on the Winegard Controller Box:
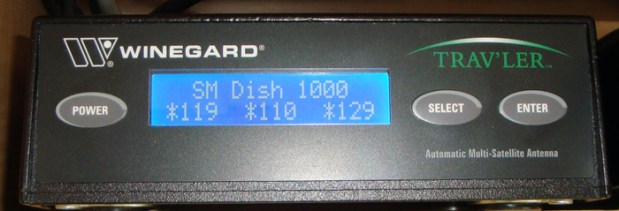
SK-1000 Controller Box
NOTE: The signal strengths on a DPH-modified Travler seem just as high as those on a standard DPP Travler. For example, these are the signal strengths I measured on 2/4/2016 (the sky was perfectly clear):
– 110° = 71
– 119° = 78
– 129° = 57 - Re-connect your Hopper 3 to the Winegard Travler. Then connect your Hopper 3 (and Joey 2.0s) to RG6 cabling. However, start by just plugging in the Hopper 3, not the Joey 2.0s yet.
- The Hopper startup screen will appear several times:

Hopper Startup Screen
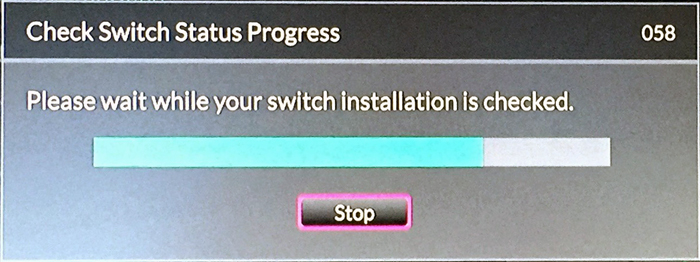
- This Check Switch message may also appear:I find it more efficient to skip this automatic Check Switch.To skip to the Diagnostics screen . . . On a #40 remote control, press the Menu button twice. On a #52 remote, press the Home button three times.

Check Switch
- Go to the Diagnostics screen. (On a #40 remote control, press the Menu button twice. On a #52 remote, press the Home button three times.)
- Select Test Installation:
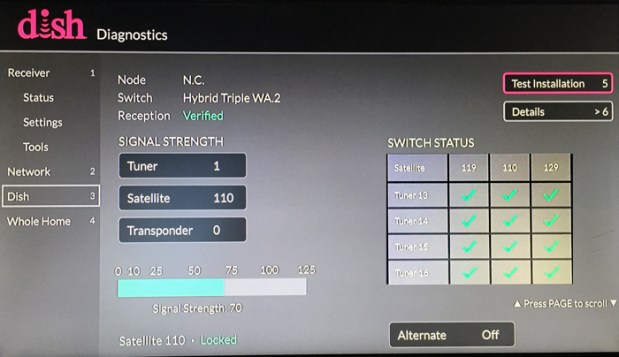
Test Installation
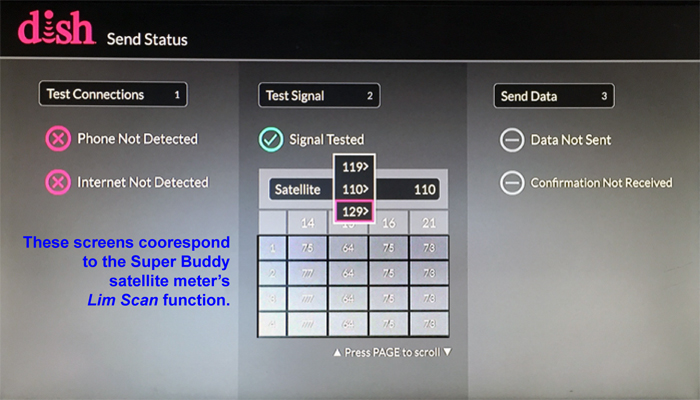
- To thoroughly test your Hopper 3, select Receiver > Status > Send Data:

Send Data
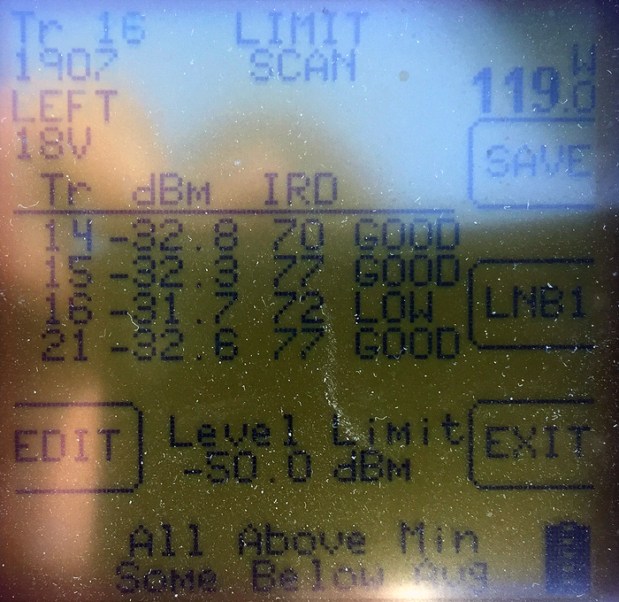
This is a screen from the Super Buddy’s Lim Scan function:
- Once the Hopper 3 passes muster, plug in your Joey 2.0s one at a time. Wait until a Joey 2.0 is successfully linked to the Hopper 3 before plugging in the next Joey 2.0.

Linking Joeys


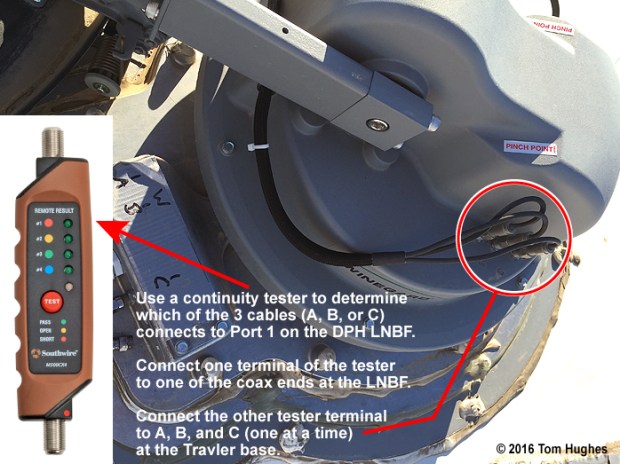
HOW DO YOU FIND PORT 1 ON A WINEGARD TRAVLER
On the standard Western Arc DPP LNBF used on a Winegard Travler SK-1000, each of the three ports on the LNBF is connected to terminals marked “A”, “B”, and “C” on both the top and the base of the Travler.
When I asked Winegard Tech Support if “A” was connected to Port 1, “B” to Port 2, and so on, they said no.
That means you have to figure it out.
How?
- Option 1 – Buy a really expensive satellite meter
- Option 2 – Buy in inexpensive continuity tester
- Option 3 – Brute Force
First, when you upgrade the Winegard Travler to a DPH LNBF, you only use 2 of the 3 coax connectors. This means that connector “A”, “B”, or “C” is essentially dead because it’s not connected to the LNBF anymore.
Option 1 – Buy a really expensive satellite meter
If you use a Super Buddy sat meter . . .
- Configure the meter to WA DPH 1000.2.
- Test each LNBF connection (A, B, and C).
- The dead connection will have 0 signal strength. You found the unused connection.
- Connect one of the other two connections to the Hybrid Solo Hub.
- Power up the Hopper 3.
- If you see the “Receiver is connected to the wrong port” message, then just switch cables.
Option 2 – Buy in inexpensive continuity tester
Option 3 – Brute Force
- I suggest running an RG6 cable from Travler base connectors “A”, “B”, and “C” temporarily through an RV side window.
- Connect one of lettered cables to the Hybrid Pro Hub. Then start up your Hopper 3.
- If your Hopper 3 powers up successfully, congrats! You’ve located Port 1.
- If you get the following message, you’ve located Port 2. You still have to keep testing, but you’ve eliminated one cable:
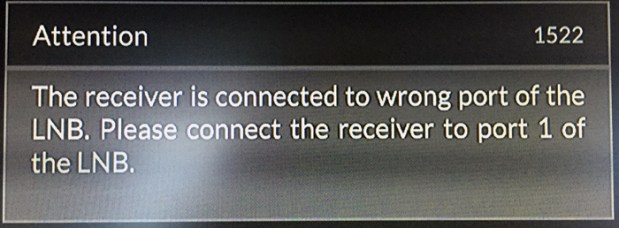
Oops
- Finally, if nothing happens on your Hopper 3 for over 5 minutes (time it! don’t cheat), then you’ve probably discovered Port 3 (the dead cable).
HOW TO AVOID THE BLUE SCREEN OF DEATH

Winegard Travler’s Blue Screen of Death
During my initial testing, I thought the Hopper 3 would act like my old Hopper with Sling (“Hopper 2”) with my RV’s Winegard Travler.
Wrong.
Thanks to advice I received on an RV forum (that’s you, Mark), I though I had better test how the Hopper 3 and Travler work when they’re both connected during the Travler’s satellite acquisition process.
The answer is — most times they don’t.
When they don’t, the “No LNB Voltage” screen would appear on the Travler’s Controller Box. Then the Travler would shutdown and stow itself. Game over.
The “No LNB Voltage” Workaround
However, I think I discovered a workaround to avoid the blue screen of death — make sure that the Winegard Travler sees an “open” Hopper 3 connection during the time the Travler is operating.
When the Travler completes its satellite acquisition process, just re-connect the Hopper 3 to the Travler:
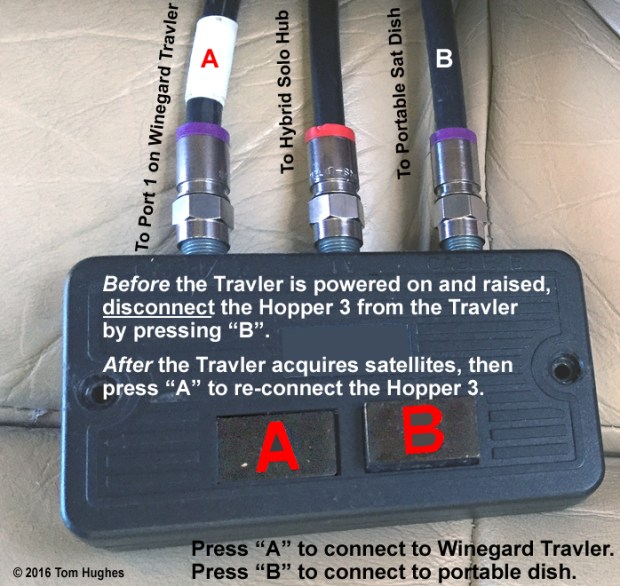
Use an AB Switch to Prevent Pesky “No LNB Voltage” Travler Shutdowns
My Test Results
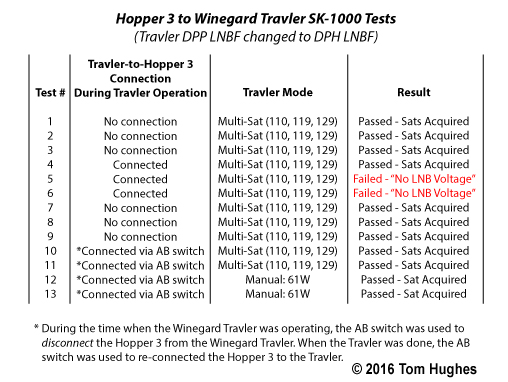
Since it was Friday, I ran 13 tests to see if a “disconnected” Hopper 3 would work with my Dish Pro Hybrid modified Winegard Travler.
The results look good:
- When connected to a Hopper 3, the Travler failed 2 out of 3 times.
- When disconnected from a Hopper 3 during satellite acquisition, the Hopper 3 passed 10 out of 10 times.
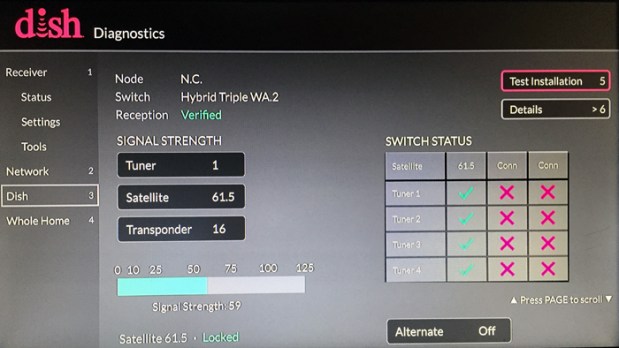
HOW TO ACQUIRE SATELLITE 61.5
Just like its predecessors (original Hopper & Hopper with Sling), the Hopper 3 can acquire the Eastern Arc satellite 61.5° in Manual Mode using a Travler modified with the DPH LNBF.
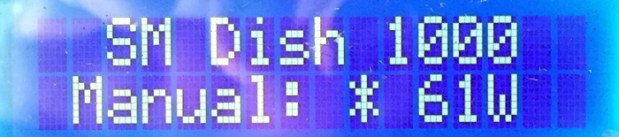
- Enter Manual Mode when powering up the Winegard Travler and select satellite 61. See the Winegard Travler manual for details.
- After the Winegard Travler finished, I tested the signal strength with my Super Buddy. This is in Arizona where 61.5° is low on the horizon so I expected a weak signal. Surprise, surprise, . . .
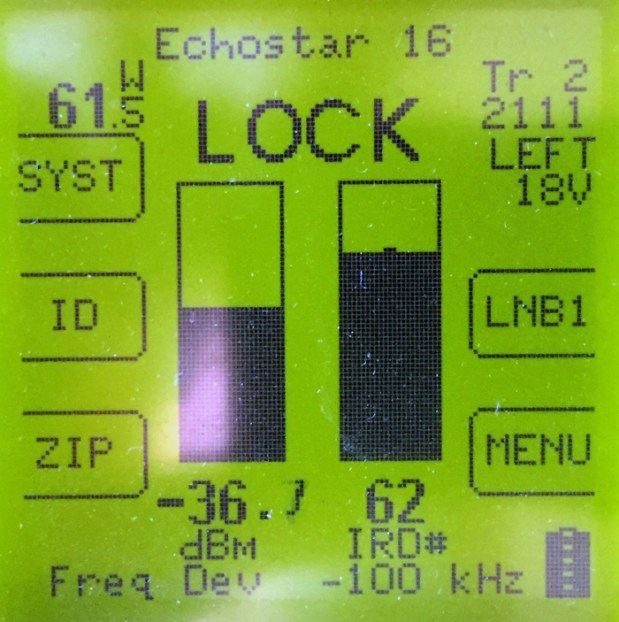
- Hopper 3 Diagnostics screen results for 61.5°: