
AV System
____________________________________________________________________
1/30/2016 UPDATE:
When 3 Hoppers are too much . . . here’s a page devoted to our new Hopper 3 setup.
7/14/2015 UPDATE:
When 2 Hoppers aren’t enough . . . here’s a page devoted to our 3-Hopper upgrade.
____________________________________________________________________
1/26/2014 UPDATE:
One result of the RV coax upgrade I did (described below) was that I installed RG6 cable that was “too good” for the original single DISH Hopper system.
The cable I ran was all rated at 3 GHz and most of it only needed to be rated at 2 GHz.
However, this mistake paid off because it allowed me to upgrade to two Hopper receivers without running any more cable. If I had done the original install “right” by running the lower frequency 2 Ghz cable, I would not have been able to upgrade to two Hoppers without pulling more cable in our RV. Argggh.
Basically, adding a second Hopper allows us to record more of our favorite programs because we now have 6 TV tuners available instead of just 3 with a single Hopper receiver.
So we just swapped out our bedroom Joey receiver for a Hopper for only $5 more per month.
Here are some photos from the 1/26/2014 installation . . .
____________________________________________________________________
ORIGINAL 2012 INSTALLATION
While I had the best intentions of keeping this a “simple” project, it soon mushroomed into a complete retrofit of our motorhome’s audio-visual system.
It was supposed to be as easy as A, B, C . . .

A – remove the door from the motorhome control cabinet
B – replace the current 26-inch TV with a new 32-inch HD flatscreen
C – upgrade the AV cabinet
Part A, removing the control door, took 10 minutes. However, the other two took over a year to complete because of my own “scope creep” . . . I kept adding and changing things. For example, I made multiple wiring diagrams for my AV system and each revision got progressively more complicated.
I finally settled on the following design:
Single Hopper + 2 Joeys System (Original design)

Final AV Design for 1 DISH Hopper (Click to enlarge)
Two Hoppers + 1 Joey System (January 2014)
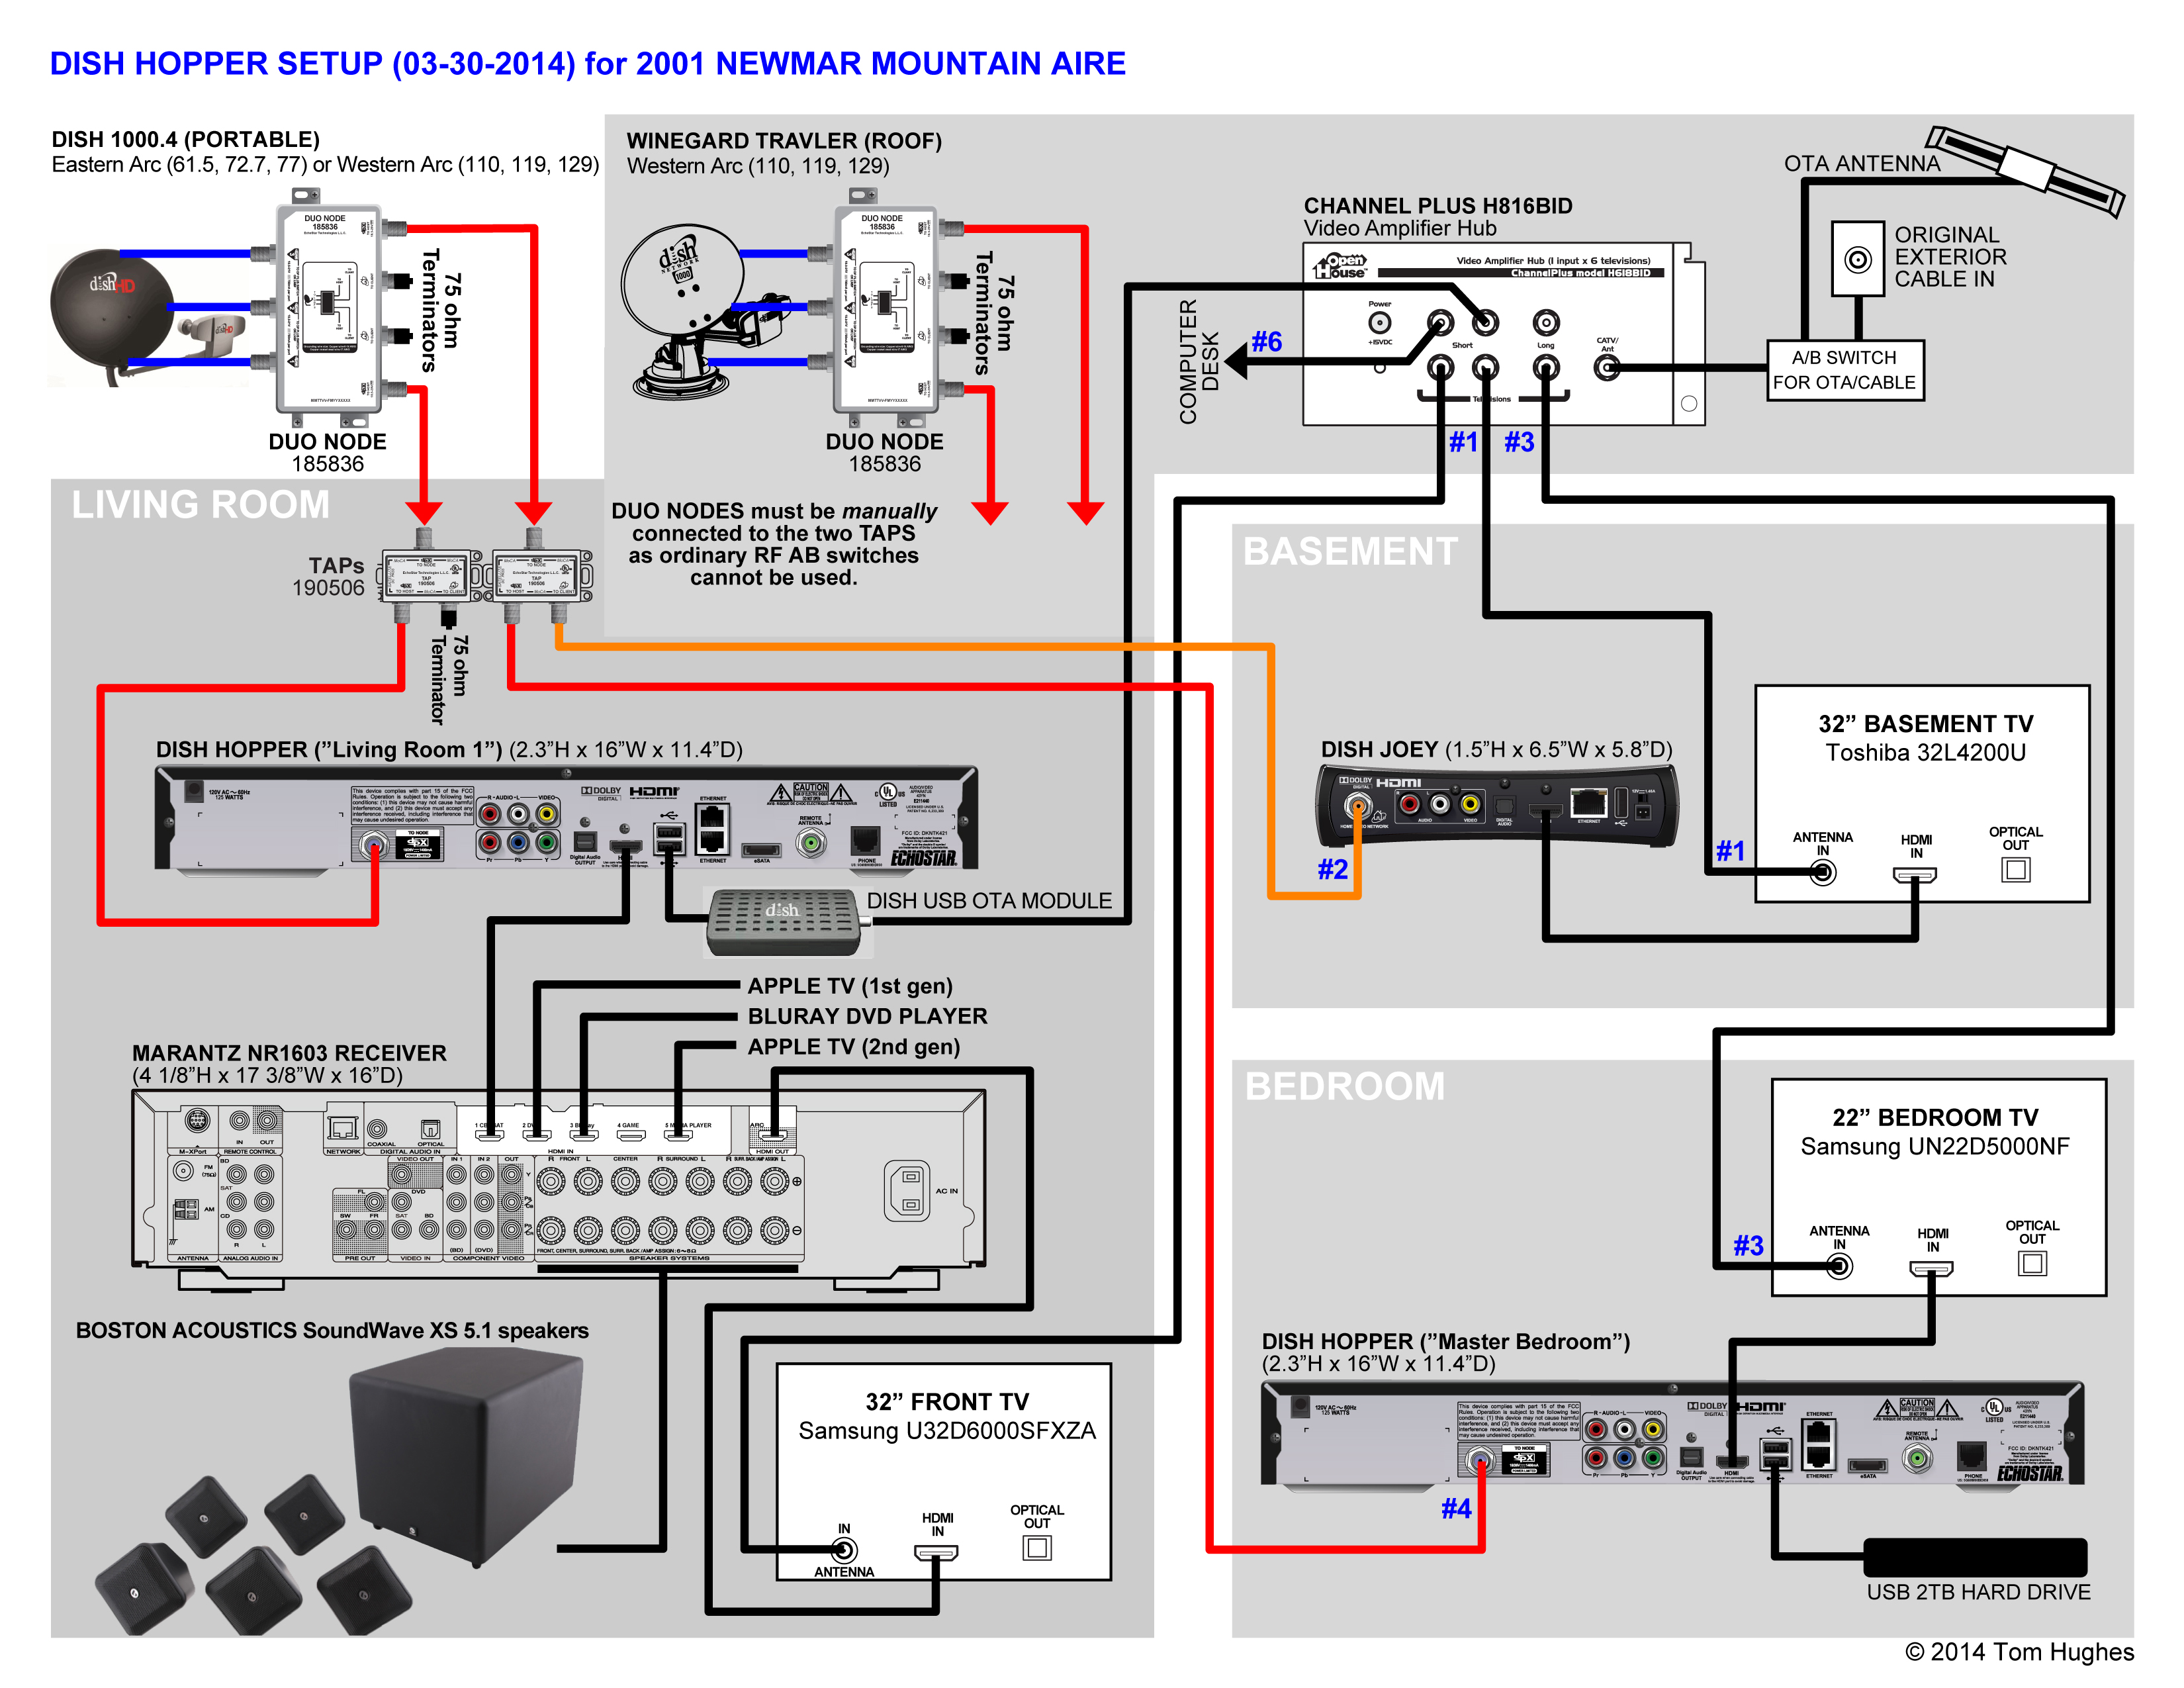
Click on Image to Enlarge
Three Hoppers (July 2015)

3 Hopper RV System (click to enlarge)
One Hopper 3 (January 2016)
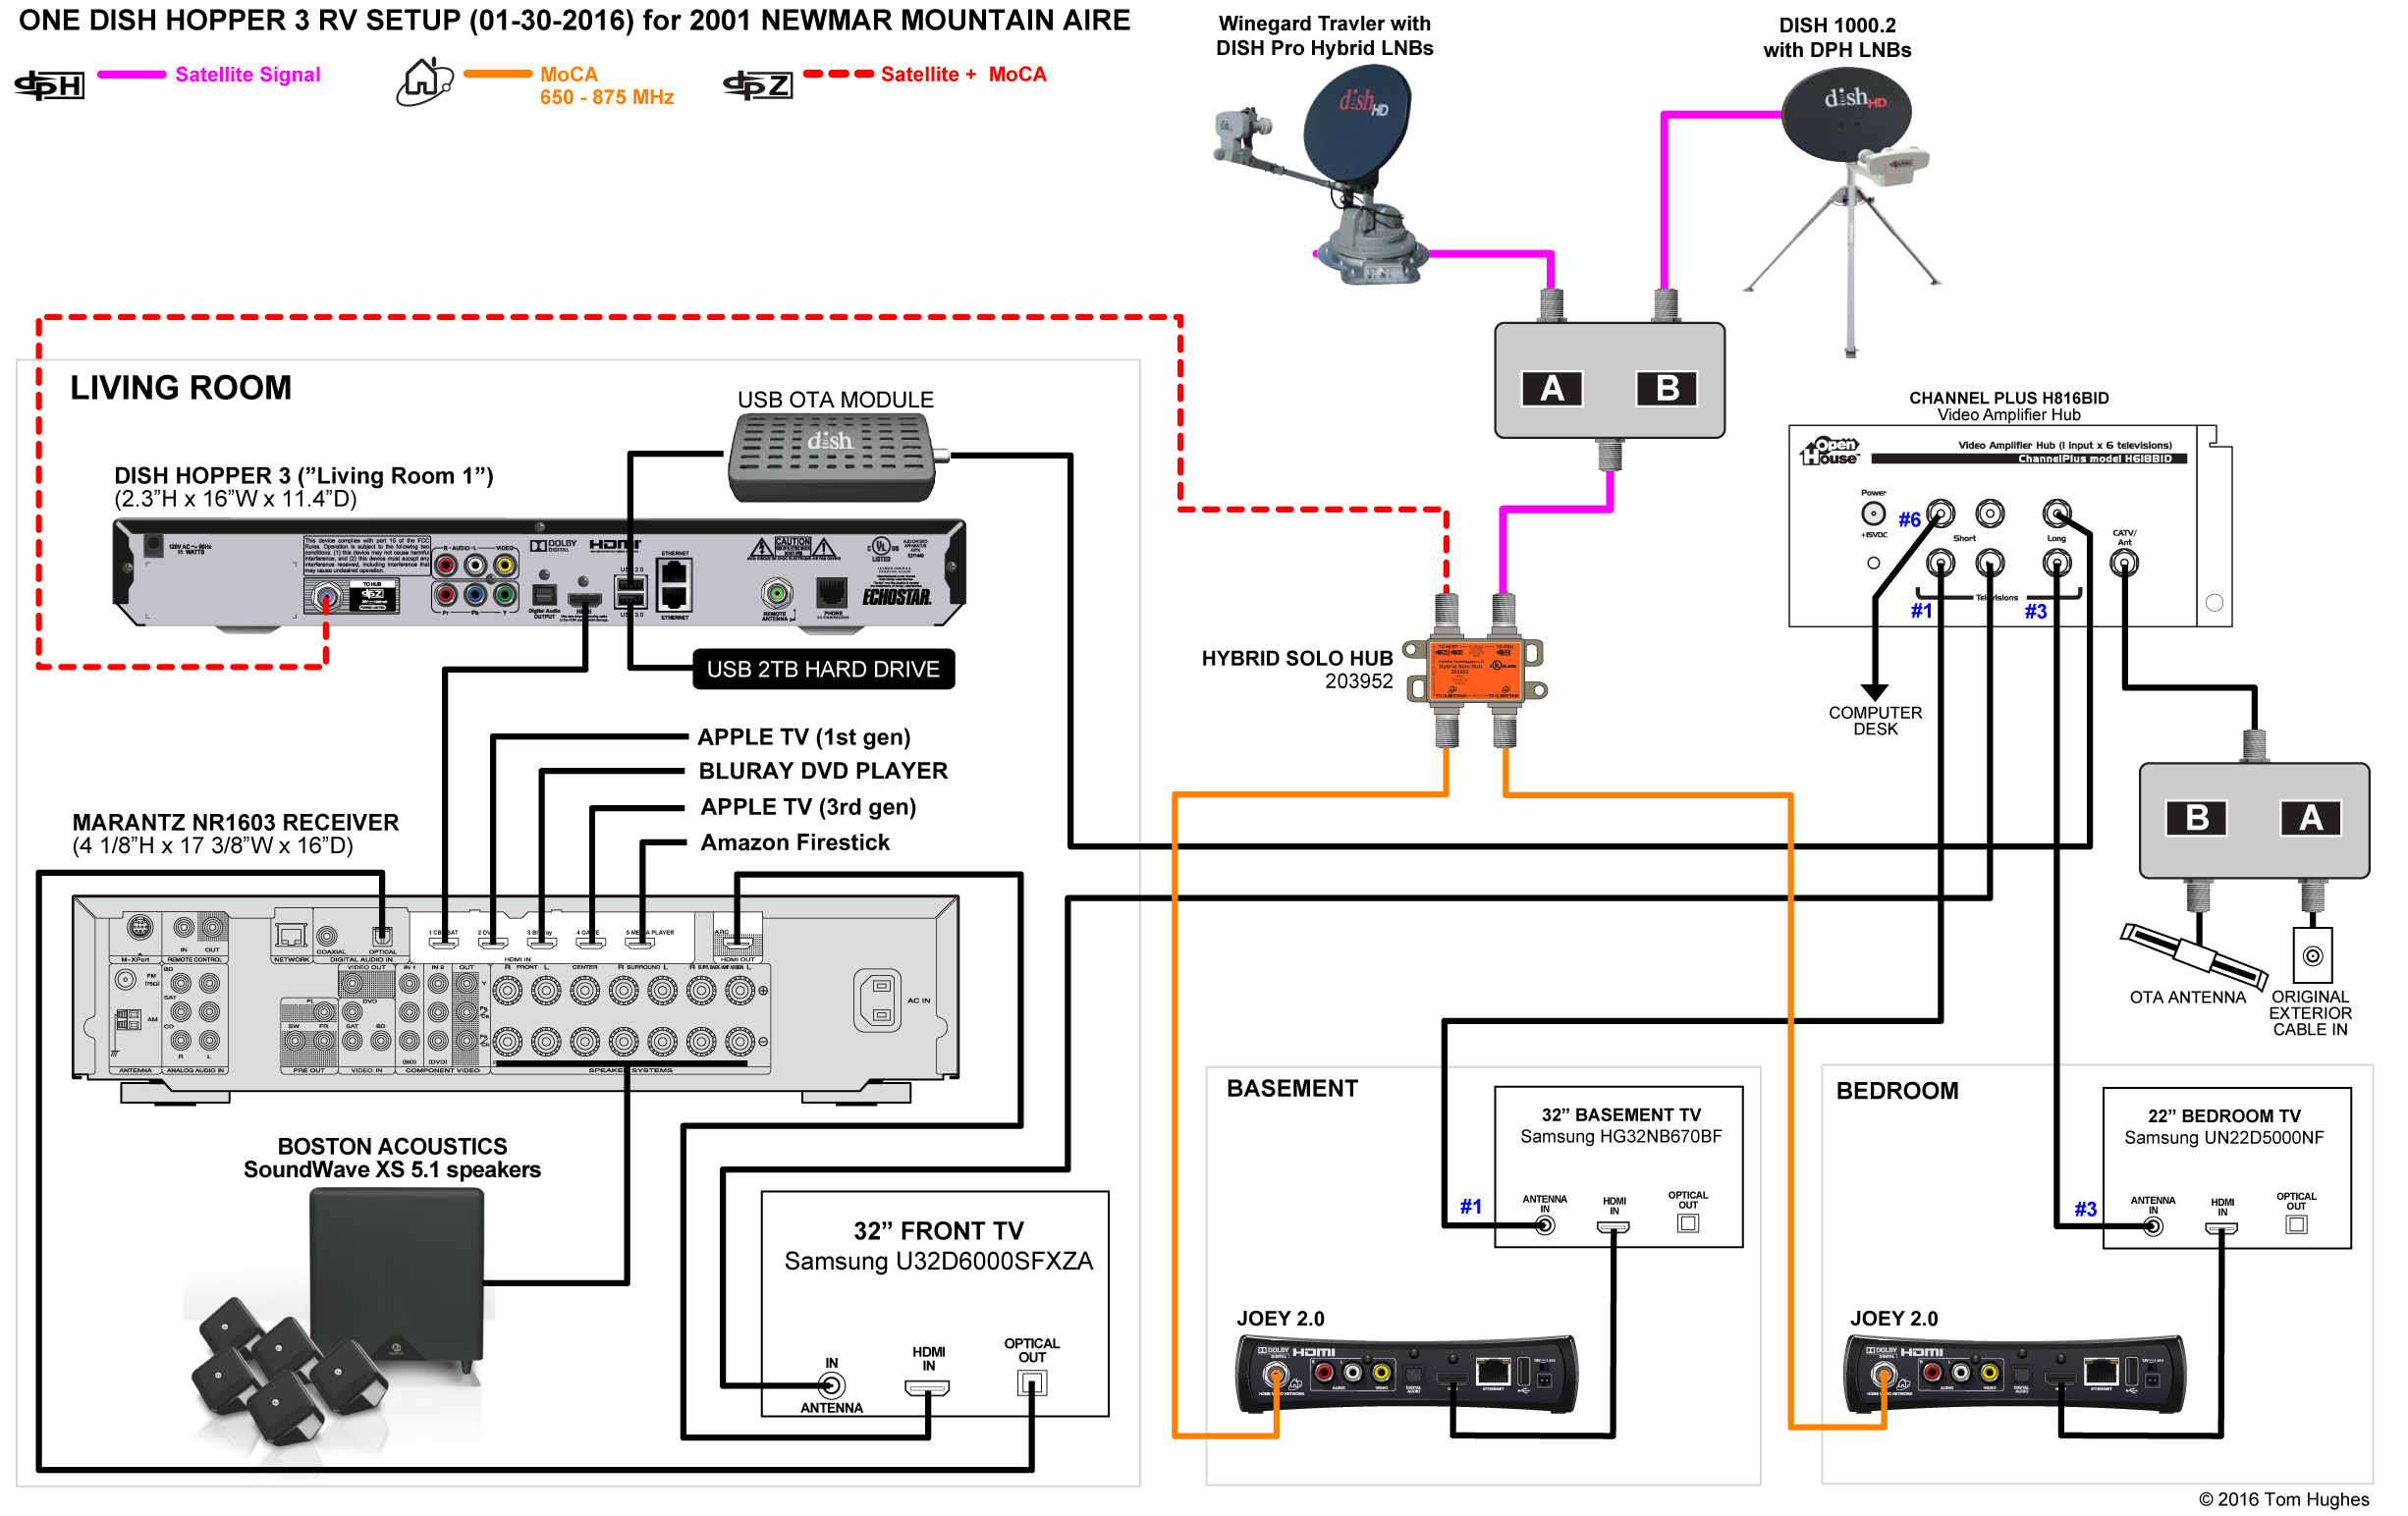
Hopper 3 RV System (click to enlarge)

Jack & the Travler
The jury is still out whether Jack is any better than the original bat wing antenna. But Jack is lighter and easier to crank up.
However, can’t say enough about the Winegard Travler . . . it slices, it dices.
Press a button and the dish automagically acquires Dish’s three Western Arc (WA) satellites — 110, 119, and 129 — in just a few minutes.
The only gotchas are if you’re parked under trees or parked too far east of the Mississippi. In either case, it just means setting up a portable dish.

Boston Acoustics speaker
Next, I installed a 5.1 set of Boston Acoustics speakers + a subwoofer. So this is really a 6-speaker system:
- left and right front speakers on either side of the TV
- center speaker right under the TV
- left and right rear surround speakers at the back of the living room

Boston Acoustics subwoofer
- and a subwoofer placed on the floor behind the passenger chair.
Running all the speaker wire was a job. A job that required a lot of Hide and Seek behind and through cabinets, transoms, and plastic wire runs.
I’ve heard that the newer technology all-in-one surround speakers are just as good as separate speakers, but . . .
. . . after watching the cheesy 2001 Pearl Harbor movie with Ben Affleck, I became a True Believer in 5.1 sound.
There’s a moment in the movie where Japanese planes begin their attack run on Pearl Harbor.
When the Japanese Zeros enter the movie frame, you first hear the planes only on the rear speakers. Then the sound of Zeros moves from rear to the front speakers as the planes advance.
The first time I watched the move, I did a double take and looked behind me for those planes.
That’s great sound!
We also installed a “basement” TV in one of our RV’s outside compartments. The TV had to be extra thin in order to fit between the RV water tank and the compartment door.
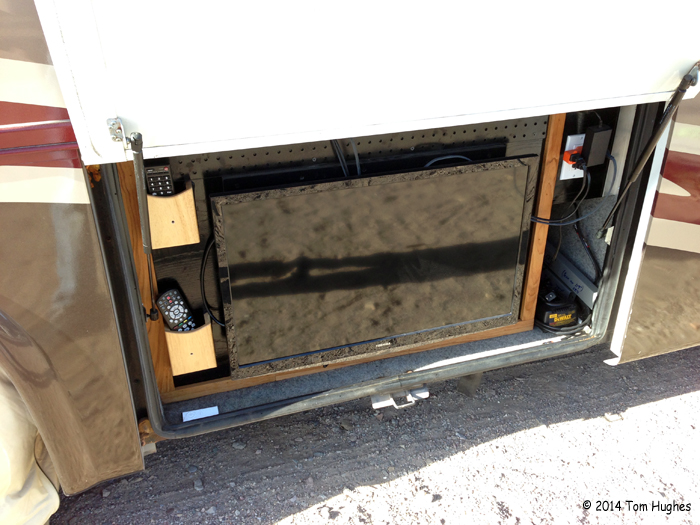
Basement TV
Here’s my installation saga . . .


Holy Crap – that’s complicated .. but it all works !! Cool Beans Tom.
Well . . . most of the times.
Tom for more simple set up, say one apple tv, one hopper, bose receiver , what would it look like ? same dish set up…..
If your Bose receiver has enough HDMI inputs, then the setup would be identical.
Tom,
Just found your link from iRV2. Nice job. I’m very interested in using a hopper and Joey in the MH. I had asked on the forum if it would work in the MH and apparently it does.
Thanks
Desperate times call for desperate measures! Are you sure this isn’t mission control for NASA? Seriously, awesome job. Goes to show what you can do when you really must have something and let’s face it, surround sound is a must have!
Tom,
Found your link through SatelliteGuys. I’m just now trying to figure out how to put a Hopper/Joey setup in my motorhome. Your two TV diagram has broken the code for me. Thanks so much for the effort you have put into researching and sharing this with everyone.
You made one comment in one of your posts concerning actually owning the Hopper/Joey equipment to the effect you didn’t think it was a good Idea. Could you share a little of the background behind your idea? I’m not wanting to commit myself to Dish, so I was headed down the purchase path.
I thought that owning a Hopper/Joey would give me a break on price — it doesn’t.
However, owning the equipment may allow you to use DISH’s Pay-As-You-Go program. Check out the Sat TV forum at Escapees (www.rvnetwork,com).
Thanks for the info. The does not seem to be a scenario in which one saves money with Dish. As long as it wasn’t some issue like rapidly obsolete equipment.
What happened to all the Tech Docs? They were there this morning, but mostly gone now. I took a peek at some of your other diagrams and one of them gave me an idea (risky at times).
I currently have two 211k receivers, only using one right now. Do you think it would work if I ran a single coax in from my tripod Dish 1000.2 to a DP PLUS SEPARATOR 123254, then connected one of the outputs to the front receiver and used the existing coach coax to connect the other output to the second receiver in the bedroom? We don’t make use of DVR, so if this configuration would work, we’d have full HD on both TVs for the cost of one separator.
I frequent Escapees Forum under the quiviran handle. You are the poster know as Zulu, unless I miss my guess.
Thanks for you help, good luck in Aridzona,
Larry M
The Separator may be worth trying. Novel idea.
Tom –
Saw your post on IRV2 about replacing your old Panasonic radio with a Clarion. You commented “Panasonic had funky camera connections”, and that you had to rewire it. I’m in the process of replacing my old Panasonic, and can’t get the rear camera to work with the new Pioneer head unit. Any tips?
I ended up buying a new backup camera from http://www.rvcams.com and ran a new wire to the dash — a real PITA.
Hi Tom,
Nice job explaining everything. Seeing where all the wires go makes it much easier to understand.
I do have a question for you, if you don’t mind? I have a dish 625 DVR receiver so I can watch one channel and my wife can watch a different channel. I’m using a Winegard 500 plus dish which feeds into the receiver through a Dish 123254 splitter. The 625 has two TV outlets (TV 1 & TV 2) which feed into a Winegard VS 6412. TV 1 feeds into the SAT and then into the front TV (Samsung 32”) on channel 3. TV 2 feeds into the AUX and then to the rear TV (Panasonic) on channel 60. Everything is working great except the process of pointing the satellite dish each time we move. I’ve tried using an Anser and a Carryout GM 1518. I can get everything to work but we both have to watch the same channel via the SAT on the Winegard VS 6412. Is there a way to use the Carryout to feed both TVs even if we have watch programs on the same satellite ( 110, 119 129)?
Steve
Is there a way to use the Carryout to feed both TVs even if we have watch programs on the same satellite ( 110, 119 129)?
I thought you could. Mmmmm . . .
The DISH 500 sat dish should work because it has 2 LNBs, right?
My only suggestion is to try bypassing the VS6412 and connecting your 625 TV1 & TV2 outputs directly to each TV.
Tom, You’re a life saver! I bought two domes off CraigsList an Anser and a CarryOut. The CarryOut is the one that worked. I did a Check Switch on the DVR and cleared the memory. The CarryOut has two outputs, Main & Aux. One coax from the CarryOut, Main, went to Satellite 1 on the Dish DVR 625 and the other coax, Aux, went to Satellite 2 on the Dish DVR 625. I plugged in the CarryOut and did an Installation on the DVR. I didn’t worry about the Zip Code but did make sure the Input was set to number 1. The CarryOut found Sat 119. Then I did another Check Switch to identify the CarryOut. The output on the DVR 625 has two outputs, TV1 and TV2. TV1 went to the Sat input of the switch box (VS6412) and TV2 went to the Aux. I set the front TV to channel 3 and the rear TV to channel 60. Now I can watch any channel on the front TV and control it with the IR remote and my wife can watch any channel she wants on the back TV and control it with the RF remote. Life is good!
Thanks so much for your help.
I love how this blog post details your RV’s AV system upgrades over time.