
Using a Hopper 3 with the Winegard Travler

After about two months of testing, it looks like DISH’s new 16-tuner Hopper 3 will work with the automatic rooftop Winegard Travler dish.
Though a standard DISH Travler will have to be modified, this allows a game-changing satellite DVR system to be used in an RV.
As of today, it looks like I am the only person to test DISH’s new Hopper 3 with a modified Winegard Travler. Though I claim bragging rights, consider this . . . you may want to wait until other folks report their success (or failure) with this system before doing it yourself.
For details, see Hopper 3 & the Winegard Travler.
54 Comments
Post a comment


This is the first site that I have found that can answer questions regarding the compatibility of the Hopper 3 with the Wingard SK-1000 dish. I have called Wingard and Dish RV support and other Dish technical support and none could answer my questions. Your articles answer almost all of my questions. One thing that I would like to do is to use the Wireless Joey instead of the wired Joey. My coach has four TVs but only two are wired for satellite connections. Not a very good design but that is what I have. To be able to hook up all four TVs I would have to run additional wiring and I would like to avoid that so that is why I am interested in the Wireless Joey. I have also been told that the Hopper 3 does not need the separate wireless access point to communicate with the Wireless Joey. This is built into the Hopper 3.
Greg
When you installed your Hopper 3 in Hybrid LNB did you have any issues with the Travler saying no LNB Voltage?
Yes. You must disconnect your Hopper 3 from your Travler during the sat acquisition process. I use an AB switch to do this.
If you’re getting the “No LNB Voltage” at other times, then the Hybrid LNB is probably not connected properly.
Currently don’t have the Hopper 3 Connected but noticed the LNB IN was connected to Port C and Port 2 was to Port B. Do you think that would cause it?
I just flipped them a second ago after swapping the LNB to confirm that wasn’t the issue.
I am curious what model AB Switch you are using and what frequency it supports?
I don’t remember the brand. It was pretty generic. Freq = 900MHz.
Tom, need a little help. I am a tech savvy guy so this does not scare me. Here is my situation. I have a Traveler 3005 currently set u for DirecTV. I want to switch to Dish and get a Hopper 3. Can I replace the dish on the traveler 3005 with a Dish Network Turbo HD home dish reflector and arm and replace the LNB with the new Hybrid LNB and carry on from there? How do I get the Winegard 3005 positioning receiver to be happy with the new dish and find 110, 119 an 129 Dish sats?
Regards, Paul
Contact Winegard. There used to be a conversion kit for a SK-3005 to SK-1000.
I have a hopper 3 trying to look for the signal and I’m getting (No nlb voltage) what can I do
Probably one of two things:
(1) Your Hopper 3 is connected to your Travler during sat acquisition — you must DISCONNECT a Hopper 3 from the Travler. After the Travler locates the sats, THEN connect your Hopper 3.
(2) You wired the Hybrid LNBF incorrectly. See my install diagrams.
I have a Travler setup for Dish. I bought a Hopper 3 receiver and the coresponding LNB. When I swapped out the LNB the Travler was already locked onto the Dish satellite and the controller was turned off. When I turned on the controller the signal was immediately lost and the system could not find the satellite again. There were three coax cables in the arm of the Travler. I only hooked up the first two. Does this third cable need to be hooked up with a splitter or is there another trick to getting the system to work?
See my Winegard Travler Hybrid LNBF Upgrade Instructions
Tom,
Thanks for the detailed write-up which encouraged me to try out the Winegard Travler with the Hopper 3. However, after following the directions as suggested, I am running into the “No LNB Voltage” issue and the unit inevitably goes into the stow mode. If I use the DPP LNB to align the dish and then replace it with the DPH LNB and test with the Hopper-3, all tests are ok and I am able receive the requisite channels. The “No LNB Voltage” issue occurs even with the Hopper-3 completely disconnected. Any suggestions appreciated.
Arwinder
Sorry it took so long . . . been busy.
Looks like you found an answer on http://www.irv2.com.
Indeed, got it figured out. I had the cables mis-identified. Thanks again for the great write-up.
Tom, misread your reply to me. so to be perfectly clear DO NOT purchase a hopper outside of dish. (so I’ll order from dish) The other part of the install should be fairly straight forward. Thanks again for the reply.
You do NOT need to purchase a Hopper at all. You should lease from DISH. However, contact a local sat dish installer to do the install. DISH will NOT let you install a Hopper 3 on your own, even if you buy it.
I have studied and studied this but still don’t yet know for sure how to do it.For a single line can I only use cable A and not B&C to the LBN?
What are you trying to do?
I am trying to get the Travler to work with the Hopper3.I hooked up the one and two cables to the new Hybrid LBN one and two connections and taped number three.What else do have to do to the other connections?Thank you.Jim
Did you follow these directions:
https://rvseniormoments.com/tech-docs/dish-tv-for-rvs/dish-pro-hybrid-winegard-travler-modification/
Subject: Fix: “No LNB Voltage” problem
Fix for the issue: Trav’ler disk SK1000 used with a Hopper 3, producing a “No LNB Voltage” message when searching for Dish Network satellites.
Use the correct LNB: The LNB is the plastic device on the end of the satellite receiver arm that has 3 knobs on it, (that look like door knobs). The new SK-1000 I purchased came with a Non-Hybrid DPP-LNB. The correct LNB to use with a Hopper 3 is the DPH Dish Pro Hybrid LNB (# on the LNB label is A13102-1G160). I have also seen the part # ES201499 used. Verify the part number, they look the same. The Hybrid version has a coax port marked LNB-H. However, this port will not be used.
After days of trying several connection schemes offered by various people on the internet, I finally found the right setup. I won’t go through all the crazy approaches people had, but here is what works for me with a Hopper 3 and a hybrid LNB on a Winegard SK-1000. Surprisingly, it is simple.
Power up the SK-1000 and “lock” it the up position before it cycles back down with the “No LNB Voltage” message. Do this by holding the power button down for 3 seconds. Let the button up and wait for the dish and LNB arm to rise to the full upright position. Then momentarily push the “Power” and “Select” buttons at the same time. This will power off the unit and leave it in the up position. Now you can go up on your RV roof and work on the SK-1000 dish assembly without the fear of it moving.
Remove the 2 screws that connect the LNB to the plastic housing on the arm. Slide the LNB out of the plastic housing. There will be a coax cable connected to Port-1 on the LNB. If the LNB is the correct one “DPH-LNB,” leave the coax on Port-1 and remove all other coax connected to other ports. Only Port-1 will be used. If the LBN needs to be changed to a DPH-LNB, remove the coax from Port-1 on the old LNB and put it on Port-1 of the new DPH-LNB. Do not connect any coax cables to the other 2 ports (Port-2 or Port-LNB-H). It is best to tape up the ends of the un-used coax cables so the center pins do not touch the metal arm. Fold the un-used cables back into the plastic housing then put LNB back in position and secure it with the 2 screws you previously removed.
Move down to the top of the turret head. The three coax cables from the LNB run through the LNB arm and come out the bottom. They connect to Ports A, B and C on the top of the turret. Most likely the cable connected to Port-A is the cable that connects to Port-1 on the LNB. This is the cable we want to use. Remove it from Port-A and connect it to Port-C. The other 2 coax cables are not used and can be parked on ports A and B to keep weather out. I said previously it was “Most Likely” that the cable we moved from Port-A to Port-C was actually the correct one connected to the LNB at Port-1. However, if someone has changed the connections it may not be true. You will find out when you power up the system. If you know how to use an ohm meter or continuity tester you can verify the correct cable before you put the LNB back in place. The bottom line is, you want one coax cable connected between Port-1 on the LNB to Port-C on the turret, no other connections. Again you will find out if it is connected correct when powering the system up as we describe later. If it does not find satellites, connect a different coax on the turret head to Port-C One of the three coax cables has to be correct.
Connect the SK-1000 to the Hopper 3: Only one coax cable is required to connect the SK-1000 to the Hopper 3. On the SK-1000 connect the coax to Port-C on the base plate. The other end of the coax needs to be terminated on Port-ODU on a Hybrid Single Node. Then a second coax needs to be connected from Port-HOST on the Single Node to the Hopper 3. I used a Hybrid Single Node in my installation, but I am not sure it is necessary. It may be possible to connect directly from Port-C on the SK-1000 baseplate to the Hopper 3, if you only have one TV. The Hybrid Single Node is used to connect coax cables to Joey’s for additional TV’s. If you use an A/B switch to select between a portable ground mounted satellite receiver and the SK-1000, it would be placed in the coax between the SK-1000 and the Hybrid Single Node.
After you finish all the connections, restart the system by holding the power button down for 3 seconds. The system may stow the antenna and power itself off, or it may start searching for satellites. If it powers down, wait for it to finish. Then power it back up holding the power button down for 3 seconds. The system should work normal. If it still has a “No LNB Voltage” message or it fails to search for satellites, change to one of the other coax cables on the turret head to Port-C. One of the three cables will be correct.
There is a good coax cable diagram that shows correct cabling and components at: https://rvseniormoments.com/tech-docs/dish-tv-for-rvs/hopper-3-use-in-an-rv/hopper-3-the-winegard-travler/ However, I found the connection ports described in the article did not work for me.
Simple coax connection summary:
1. Connect DPH-LNB Port-1 to Port-C on the turret.
2. Connect Port-C on the baseplate to Port-ODU on the Hybrid Single Node.
3. Connect Port-HOST on the Hybrid Single Node to the Hopper-3
4. Connect Joey’s for other TV’s to Ports-CLIENT on the Hybrid Single Node.
Note: No other coax connections are necessary.
A few comments:
1. Some people write that the Hopper 3 must be disconnected from the SK 1000 with an A/B switch or the dish will not find Satellites. I found that “not to be true.” The system comes up fine if it is connected as described above.
2. I found there is a recommendation to not use a Hopper 3 with a Winegard Traveler SK-1000 with a DPH-LNB because it has problems finding satellites. This was not the case the way I connected it. The Hopper 3 is far superior to previous models.
Bob, adding a DHP LNBF to a DISH Winegard Travler is no longer the preferred method for using a Hopper 3 in an RV as there are way too many hoops to jump through.
The preferred method is to use a DPH42 switch: DPH42 Switch Option
Tom when using the DPH42 do you have to run all 3 coax cables from the Travelr to the DPH42? I only have 2 Coax cables currently ran from my Travelr to where my solo node is located on my RV And wondering if it will still work with the DPH42 Switch and Hopper 3.
I currently am setup with the DHP LNB using 2 cables and it works well as long as I have the Hopper powered off when I bring up the Travelr but thinking about changing to the new design.
You need to run all 3 cables from Travler to DPH42.
Ok thanks I will just stick with the DPH LNB for now I don’t want to try and run more COAX through my roof now that its all sealed up.
Tom, I am not understanding why you say a DPH LNBF is no longer the preferred method for connecting a Hopper 3 in an RV. What can be simpler than a single coax for complete functionality. I found the DPH42 is unnecessary. Did you try using the connections I described in my “Simple coax connection summary”?
Well at 75 years old I tried.LOL I followed the connections ok at the LBN but not sure if I was suppose to change the Turret connections or the Base?Sorry.
Suggest you contact a local DISH installer and point him to my install drawings. I’m 10 years younger than you and I don’t like climbing around on my RV roof.
Been up there six times and that’s six to many.Thanks anyway.
Figured it out and works great.
How did you fix it?
Used a ohm meter to determine which cable was which. Had them wrong.
Get Outlook for Android
________________________________
Used a ohm meter to determine which cable was which. Had them wrong.
Yes I have tried it- and it does work fine… The winguard and the Hopper 3….
Set up as described – unhooked from hopper
and find satellites Before hooking hopper inline…
I only wish Winguard would allow the eastern arc to work also- instead of only western arc..
My question is not to do with the original set up which you have covered well. I do not live in my RV and in the past I have been required to call Dish each time I have gone out. They state that they need to re-Ping my Sat Receiver because it has not been active for the past 30 days. Am I going to need to continue to do this with the Hooper 3 and if so, am I going to need to do your entire set up as described ( https://rvseniormoments.com/tech-docs/dish-tv-for-rvs/dish-pro-hybrid-winegard-travler-modification/) each and every time?
I don’t know.
I have used a hopper 2 and wired joey in a RV for our yearly Christmas trip .. Have a digital roof antenna and the usb dongle for local channels .. Would the Hopper 3 work for me our do I need to do some rewiring and get a new Dish ?
Yep, a Hopper 3 will work with your OTA antenna + the USB dongle. Remember, however, that this just gets you local OTA TV stations.
If you want all your DISH programming, then you need a setup like this:
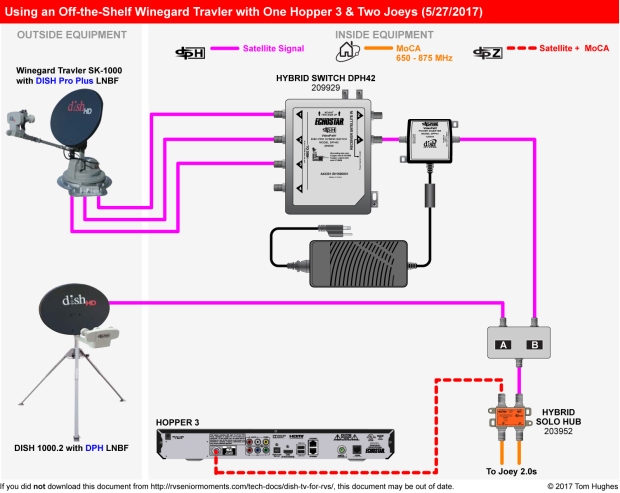
I used Hybrid LNBF on my Trav’ler for a year and a half dealing with extended seeks times. In the far east (PEI) I had seeks up to an hout when the Trav’ler gave up and stored. The second try would make it. Switching back to a DPP LNBF and a DPH42 switch cut my seek time in half when I tested it in NY.
I have not experienced that problem. My seek times are about five minutes from a new location, and far less from an existing restart location. I am connected with a single coax through Port C instead of Port A on the turret and base. I had similar problems as you when I used Port A. Could that be the difference?
If I install a DPH LNBF and a Hopper 3 with no Joeys, must I still use a Solo Hub. Will the Hopper 3 work with an A/B switch connected directly to the hopper 3 without a solo hub.
I don’t think you would need a Solo Hub — but have one handy just in case.
I plan to use one wireless Joey only
Wayne…how did the wireless Joey work for you? I assume you put it in the bedroom and the H3 is somewhere in the front of your bus?
Tom…we had the Hopper 3 installed with Winegard SK-1000 satelite and Hybrid triple LNBV by a Dish sub contractor towards the beginning of this year. It worked perfectly all this time, and we are full time RVers. However, we have been stationery ever since it was installed and then we just went on a 2 week vacation in the RV, and could not get TV at all. It also said ‘No LNB Voltage”. My husband tried everything, and then we found this discussion this morning. He STILL, after reading your instructions and all of the comments, cannot get it working. Any suggestions?
Lower the Travler. Then disconnect your Hopper 3 from the Travler. Now raise the Travler & re-connect your Hopper 3.
He tried that several times. He just told me that the satelite is not finding a signal. He thinks there’s no power to the LNB.
If the sub contractor replaced your Travlers LNBF with a Hybrid one, then get him back and put back the original LNBF. Then have him add a DPH42 switch like so:
Hopper 3 & Winegard Travler with DPH42
There is an excellent YOU TUBE installation/conversion video on making the 1000 compatible with Hopper 3! Just Google for it. It requires a HDP !SWITCH & a Solo node. Simple rewiring on the roof , less than 5 min.
Although it makes wiring easer than installing it inside an RV, I don’t recommend installing a DPH42 switch on an RV roof as shown in this YouTube video.
While the switch can be installed outside, it was never intended to be placed on a roof constantly exposed to direct sunlight.
Perhaps I could ask a question even though this thread is a bit dormant. I’ve been running your suggested setup without issues for the past year. (Travler, DPP WA LNB, DPH42, Hybrid Solo Hub, Hopper 3 & Joey). Works great. Thank for figuring this out. We used your instructions to set all this up.
Today we are suddenly getting a “Port 2 No Signal” error under “issues” when we run “check status” on the Hopper. I don’t know whether to replace the LNBF, the DPH42, the Hub, the Hopper, the 3-cable braid between the LNBF and the Travler, or what. Might you have any suggestion as to where to start?
Are your Hopper & DPH42 both off before you start up your Travler?
Yes. I power them off. I don’t rely on the A/B switch method, though I’m going to try it soon. After asking this question here, it worked fine when we moved to the next RV park. I now suspect a tree was blocking the 129 sat at the last place. I used a phone VR camera app from behind the Travler and thought I was clear of the tree, but now I’m not so sure. If it happens again, I’ve got a spare WA DPP LNBF to try and will just work down from there. The trouble for my brain is there are 4 places in the system where there could arguably be a Port 2: The LNBF, the rotating deck of the Travler, the base of the Travler and the DPH42. Hopefully this will turn out to have been a transient error. Thanks for the reply.